Old Man
Newbie

Posts: 46
|
 |
« on: December 15, 2015, 06:25:30 PM » |
|
I am starting on a project to convert a 1/72 ICM I-16 kit to a tip 10. The subject of the model will be this well known late Spanish Civil War example: 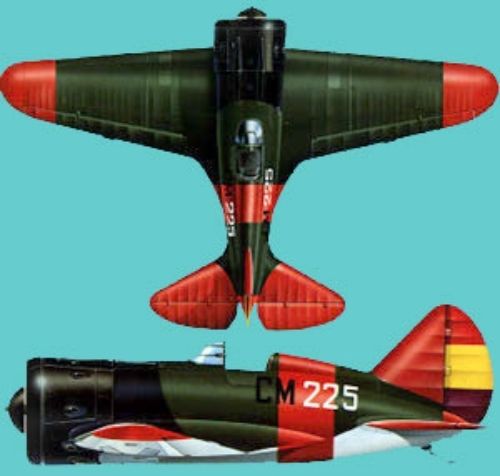 I have tended to the lower surfaces behind the cowling, getting the profile right and putting in the central exhaust ports. Pictures will follow soon. Before I get too deep into this, I want to be sure about a few things. This was a Soviet-built airplane? Presumably its finish was in line with the 1937 standards (the new darker field green and a light grey undersurface, rather than the earlier more olive tone and light blue-grey undersurface)? Interior would be the usual medium grey? |
|
|
|
|
 Logged
|
|
|
|
|
Massimo Tessitori
|
 |
« Reply #1 on: December 15, 2015, 08:20:42 PM » |
|
Hi,
a photo of the plane would be useful; anyway I guess that it's a Soviet-built plane. Some I-16s were built in Spainj, but they were distinguishable for the higher dorsal fairing and the 'long' ailerons as earlier types.
For the undersurfaces, it's possible that they were grey, but it's also possible that the fabric and wood covered surfaces had a silver finish.
For the cockpit, I guess that light grey AE-9 is more likely. Photos of I-15bis seem to show light grey, and I remember something written on the AKAN site about AE-9 being utilized on the inside of I-16. The I-153 of bourget has light grey in the cockpit, and dark grey on the landing gear bays (at least, so seems on the photos I've seen).
Regards
Massimo
|
|
|
|
|
 Logged
|
|
|
|
Old Man
Newbie

Posts: 46
|
 |
« Reply #2 on: December 15, 2015, 09:46:57 PM » |
|
This is scanned from the Osprey 'Republican Aces' number, Sir: 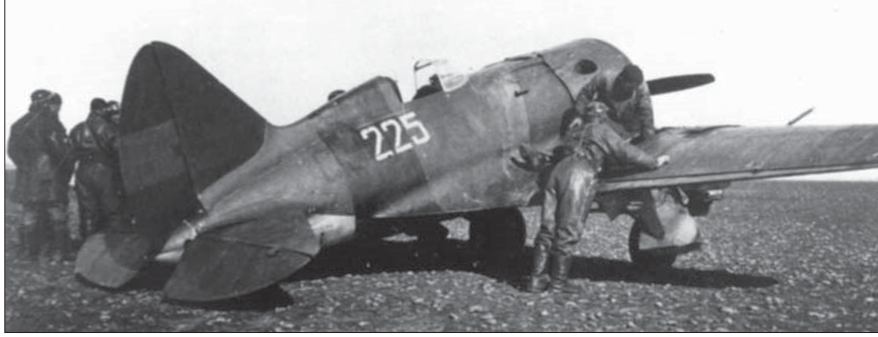 I have seen the plane described as 'one of the last batch' of I-16s sent to Spain, but I do not know what that date was, or what it might indicate about when it was built |
|
|
|
« Last Edit: December 15, 2015, 09:49:52 PM by Old Man »
|
 Logged
|
|
|
|
|
Massimo Tessitori
|
 |
« Reply #3 on: December 16, 2015, 07:08:02 AM » |
|
Hi,
nice photo.
Undersurface of fuselage doesn't seem silver. Could be grey, or repainted blue by Spanish.
I have doubts on the red on elevators and stabilizators. In my idea, the closer one was simply repainted green because of some damage, whilst the far one is as the fuselage. The upper part of the tail cone could be purple as the lower part of the rudder. I don't know for the nose, it seems of the same shade of the red band on the fuselage, but it is compatible with the inscription CM supposed worn black. Could also be a repainting as on the stabilizer, because traces of wearing are absent on it.
The inscription drawn on the profile looks a bit too big.
Regards
Massimo
|
|
|
|
|
 Logged
|
|
|
|
Old Man
Newbie

Posts: 46
|
 |
« Reply #4 on: December 16, 2015, 08:39:42 AM » |
|
The red seems pretty well attested, Sir. The machine was flown by the commander of Grupo 21, and it was a recognition mark. His name was Zarauza, and he was well known; he was very young for his rank, and made much of. I agree the nose could be as easily red as black, by the picture. I found this old site, on archive: https://web.archive.org/web/20040319154216/http://usuarios.lycos.es/SANMARCA/It is in Spanish, and its 'deliveries' page indicates this machine was part of a batch arriving in August, 1938, shipped through France. Maj. Zarauza became commander of 21 Grupo late in July, so the dates match for usage, it would seem. Government accounts credited Zarauza with 23 victories as of June, 1938, but no documentation survives. He fetched up in the Soviet Union, joined the VVS, and was commanding the 961st IAP at Baku when he died in October, 1942 (just a few weeks shy of his 25th birthday). |
|
|
|
|
 Logged
|
|
|
|
Old Man
Newbie

Posts: 46
|
 |
« Reply #5 on: December 16, 2015, 09:01:49 AM » |
|
Here is the heart of the conversion --- dealing with the differences in the underside of the nose between a 24 and a 10. The first thing I did was glue the lower cheek-pieces to the center-section piece. I may have given myself some seam-work in future by doing this, but I wanted to get the alterations done before the model was assembled. I sanded down the oil cooler tunnel to a proper profile for a 10; the plastic there is thick enough to handle this. I cut away the recesses for the skis from the inside, and squared the result away. Here is what was left: 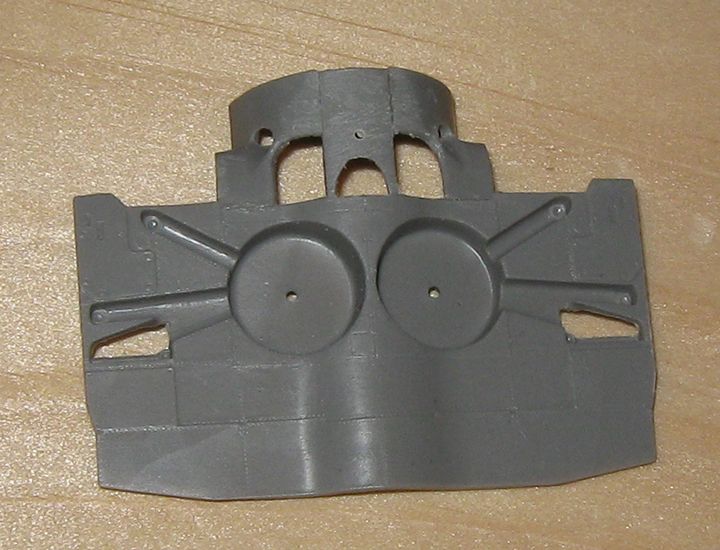 The 'ski' openings are 4mm x 5mm (with a corner rounded), and the gap left where the rear of the oil cooler tunnel was is a little less than 4mm wide, and about 2.5mm deep. I cut bits of 1mm sheet to match each of the holes, bent them a little with a tweezers, and glued them in with CA gel. I leveled them to the interior surface. the bit that stood proud of the exterior I mostly whittled away whit a #10 blade, then sanded, both inside and out: 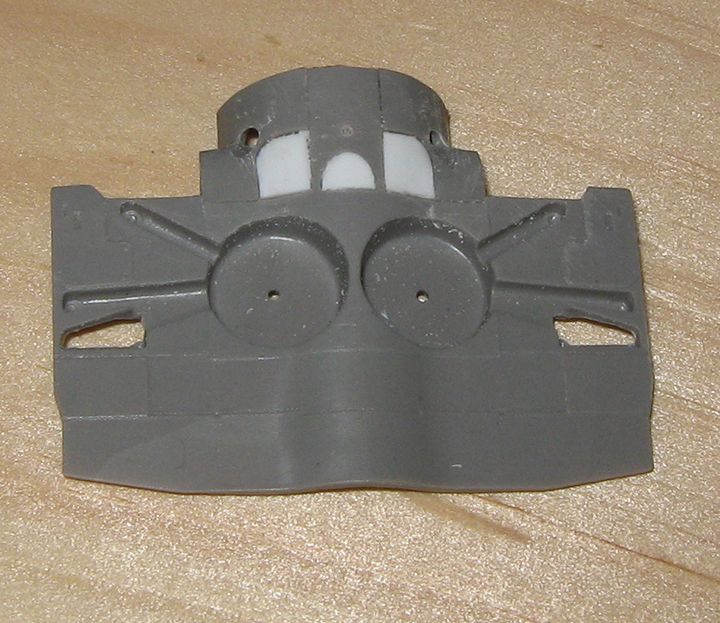 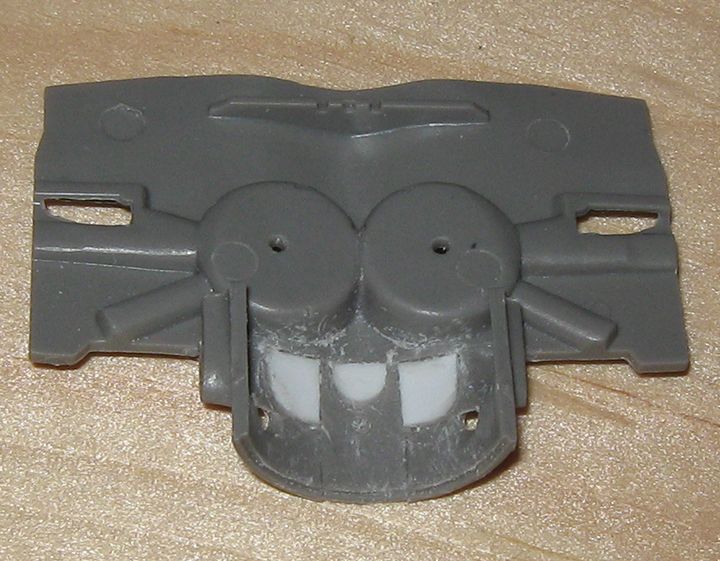 I then marked the location where the new exhaust outlets would be, figuring from the dimension of the existing outlets, and from the where the cylinders stood when I held the motor in place. I then cut the new holes in, doing my best to imitate the pattern of the kit's outlets --- a sort of semi-circle clear through in front, and a triangular groove behind: 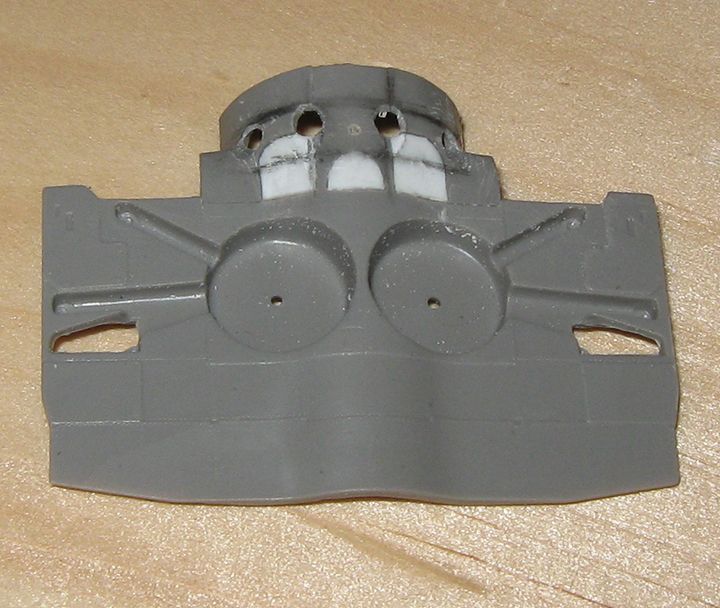 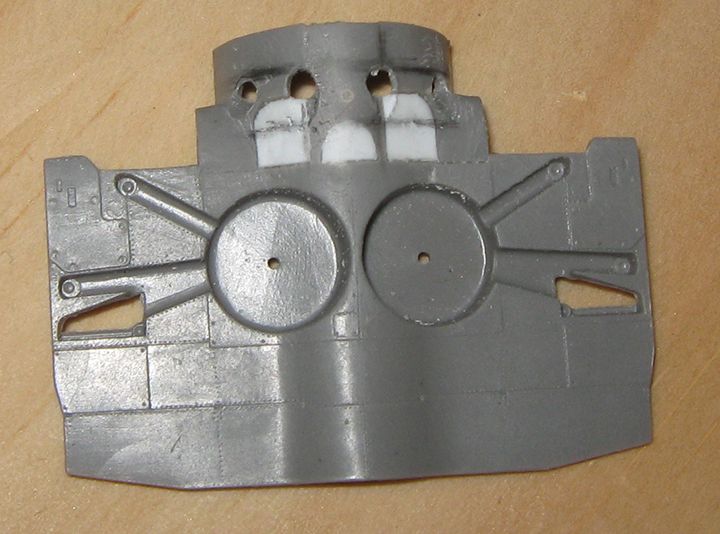 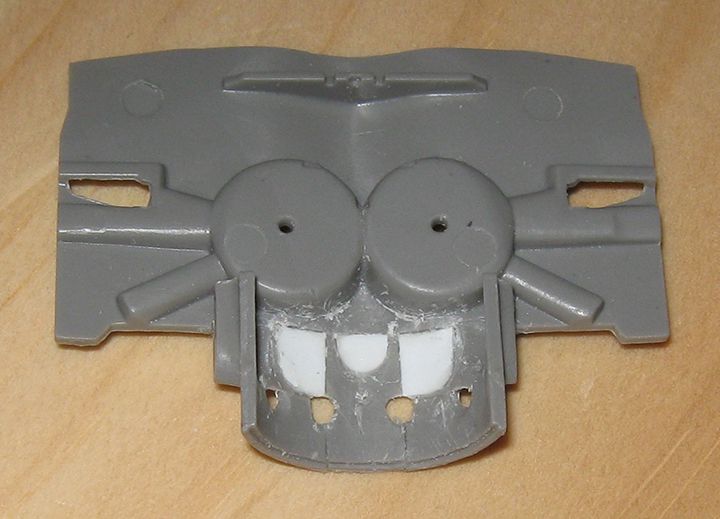 I put in the hole by twirling an old #11 blade, and trimmed to shape with a new blade. I cut a 'v' groove for the rear portion with the new blade, and then did final shaping with a rat-tail file. The locator line ran right along the seam of the 'ski' patch and the central 'tongue' of the center-section piece, which was a help in keeping things symmetrical. Here is the piece under a coat of primer: 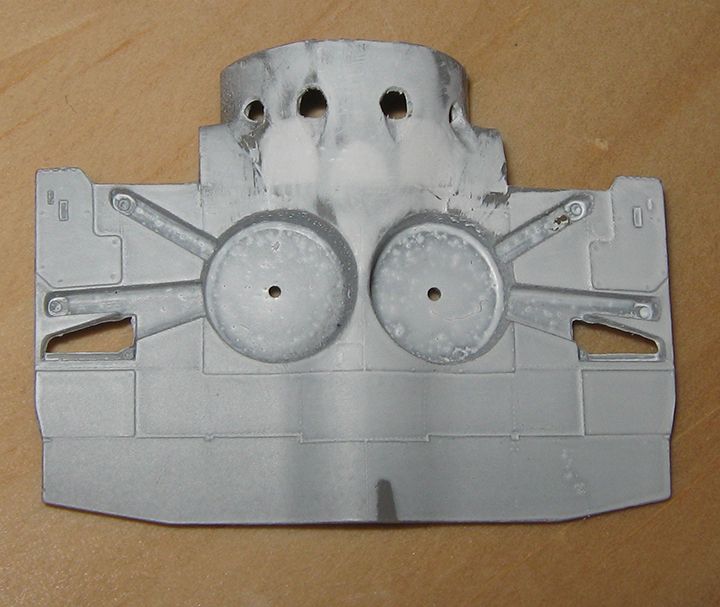 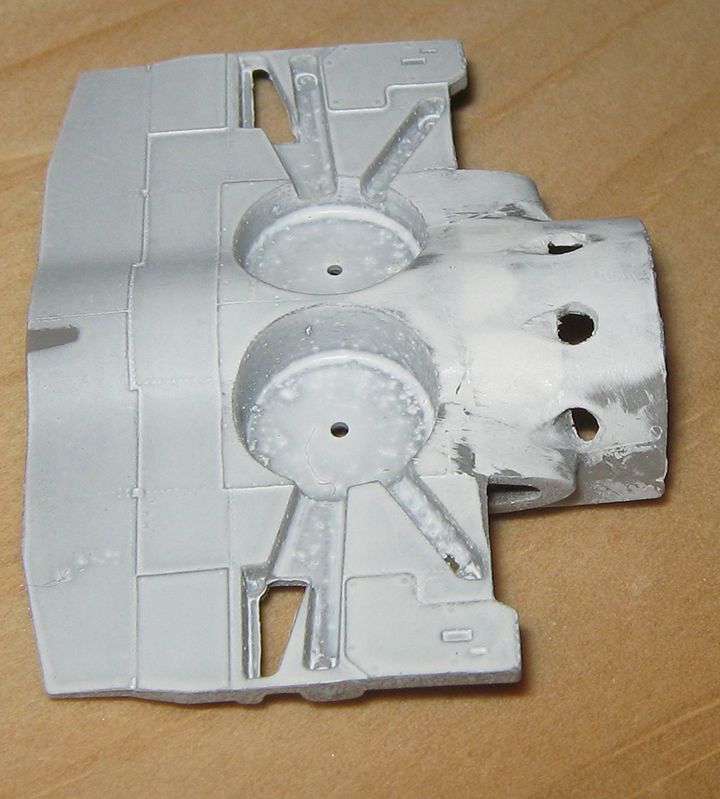 With this in hand, the rest of the conversion is more a question of small details. I am going to be putting in a pilot figure, though I expect I will still do some cockpit detailing. But my focus in this build is the over-all finish, and 'proof of concept' as regards turning an ICM tip 18/24/28 into a tip 10. |
|
|
|
|
 Logged
|
|
|
|
|
Massimo Tessitori
|
 |
« Reply #6 on: December 16, 2015, 12:45:46 PM » |
|
Hi,
I'm still a bit skeptical on the red tail, but if it's red, this color has to extend on the most part of the fillet too, as visible on the photo.
The conversion work is interesting, type 10 has more painting possibilities than later versions.
Regards
Massimo
|
|
|
|
|
 Logged
|
|
|
|
|
KL
|
 |
« Reply #7 on: December 20, 2015, 09:18:35 AM » |
|
Hi Old Man, Type 10 is OK, but IMHO, Type 5 would be even better...  Type 5 epitomizes original Polikarpov's idea to combine the most advanced aerodynamic layout (streamlined cantilevered monoplane with retractable landing gear and enclosed cockpit) with powerful radial engine (imported Wright Cyclone) and mixed wood-metal-fabric construction that was already mastered by Soviet aviation industry. I-16 Type 5 was also historically more important: when they appeared over Madrid in fall 1936 western world was surprised in a similar way it was supersized when Mig-15 appeared over Korea some 15 years later or when Sputnik was successfully launched in orbit in 1957. In 1936 Soviet military aid (including I-16s) saved the Republic; in 1938 Soviet arms couldn't change anything... On other hand, your choice for I-16 type 10 is also intriguing: probably the most controversial I-16 Type 10...  You also did a great job revealing details about that particular plane (CM-225)... Check this link: http://www.aviacioiguerracivil.com/el-vesper-pacs.phpIt's about the Pacs-Vilob? airfield on which the only photo of CM-225 was taken probably during the Battle for Ebro   Few notes: - marking commanders plane with all red tailfin and tailplane wasn't common in Republican Air Force and in Soviet VVS - factory painted I-16 Type 10 definitively did not have black engine cowlings - letter "C" doesn't look black on the photo; it's lighter than red fuselage band - letter "M" is vaguely visible and also lighter than red fuselage band Regards, KL |
|
|
|
|
 Logged
|
|
|
|
Old Man
Newbie

Posts: 46
|
 |
« Reply #8 on: December 22, 2015, 05:56:38 AM » |
|
I agree the tip 5 has more historic significance, and more widespread service. For me as a modeler, the problem is the canopy. In the A-Model tip 5/6 kit, the canopy for the 5 is horrible. I am no good at smash-moulding, and do not have a vacu-form unit. So a decent tip 5 is not in reach for me at present. Were the canopy problem not present, I expect a conversion from the ICM to a tip five would make a better model than could be got from the A-Model, and would probably involve less work and modelling time. I have done the A-Model twice, and there is a good model in there trying to get out, no question. But the A-Model is a bit chunkier than the ICM, enough that if you have them side by side on a shelf, the difference is noticeable if you look close. I have no idea which is accurate, but I prefer the slimmer lines of the ICM. Regarding black cowlings, I expect you are right about the state in which they were supplied. But they may have been painted locally. Here is a scan from the Republican Aces number: 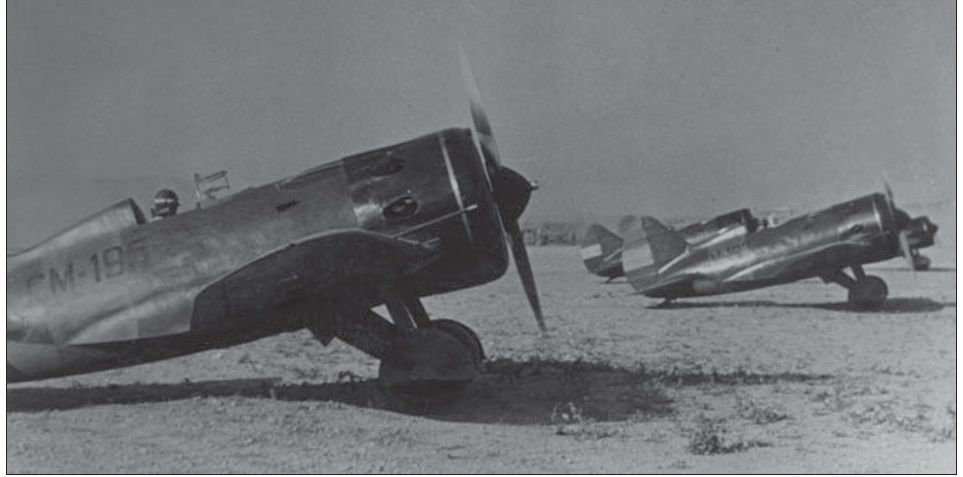 These are certainly tip 10s, and are captioned as machines of the 3 Escuadrille taking of during the Ebro fighting. The cowlings read as black to my eye; they are certainly different from the fuselage in tone. This picture looks to be taken on panchromatic stock, judging by the yellow on the rudder, and by the much darker appearance of the lettering on the fuselage band. I think the lettering, too, can be taken as black. It seems to me there was a system in the Republican air service under which some portion of the serial identifier on command element machines was rendered in white, while the standard was black. I would guess the photograph of CM-225 was take on orthochrome stock, probably with a yellow filter, a pretty common practice taking pictures outdoors, as it let white stand out against blue. That would account for the similarity between blacks and reds. Direct sunlight can do strange things as well. In the picture of CM-225, the sun is high and well to the photographer's right; this could 'fade' with glare the letters CM, as it makes the white of the 225 awfully bright. I agree that a red tail is unusual. But the pilot of this plane was unusual, too. He was very young, he was a publicized star. People who attract notice generally make some display in order to be noticed, and stay noticed. And a marking which was both bright and unusual would certainly draw notice, and make an effective recognition device for a leader in the air, and a character in the newspapers. The Osprey Republican Aces number was published in 2012, and so the author has had opportunity at least to avail himself of much more material than was formerly available on Republican operations and personnel. From his description of sources, and his handling of them in the body of the work, I am inclined to take him as correct when he commits to a detail. I understand I could be wrong. But I do not think this is the same sort of case as the 'red wing' MiG in the snow at Moscow, for example. The tail on CM-225 is definitely quite different from the fuselage green, and I would read it as either red or black if I came on it with no supplementary information. |
|
|
|
|
 Logged
|
|
|
|
Old Man
Newbie

Posts: 46
|
 |
« Reply #9 on: December 30, 2015, 06:34:19 PM » |
|
More progress on this. First, the wings are on.... 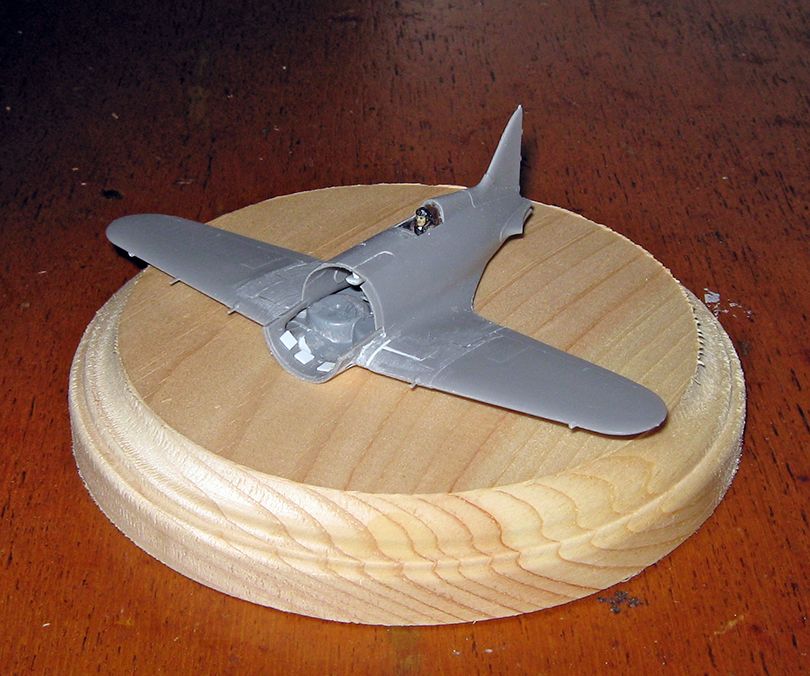 There were fit problems, which I expect owed to some combination of my early attachment of the lower cheek-pieces, and some sloppiness in setting the center wing piece in place. In two previous goes at this kit, I recall the wing fit as being no shake and bake, but not nearly what I had this time. You can see the shimming in the picture, some of it employing 0.5mm strip. Much raised surface detail went in cleaning up the seams. I used heavy foil tape to restore raised surface detail.... 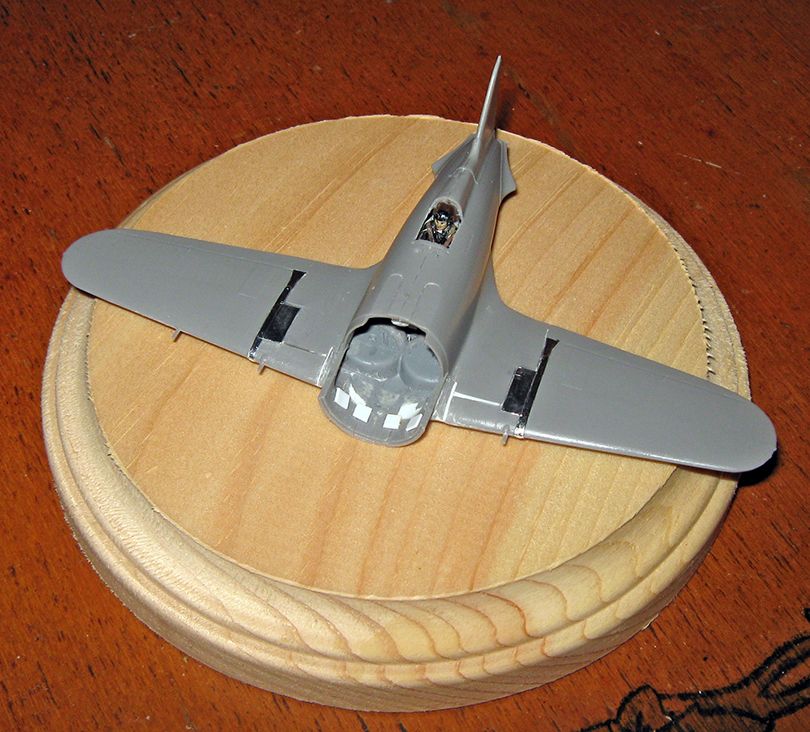 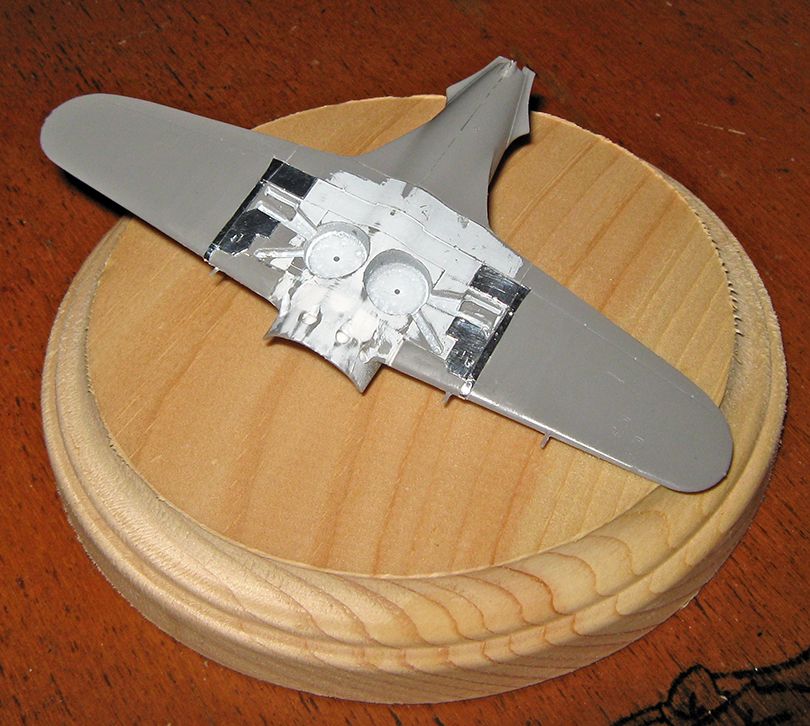 This stuff is thicker than kitchen foil, but still thinner than five thou card. It has a thick coating of adhesive, which can make it difficult to handle, as there remains for a while some 'give' to the surface that can allow deep nicks from a fingernail or toothpick. But on balance, it is easy to use and readily available (a roll is a lifetime supply). Here is the thing under a coat of Tamiya Fine White.... 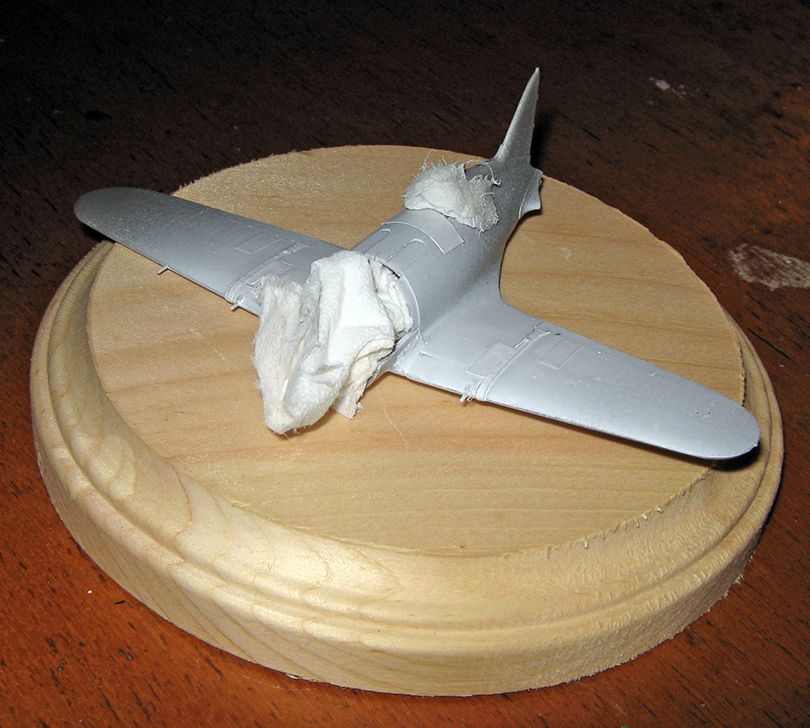 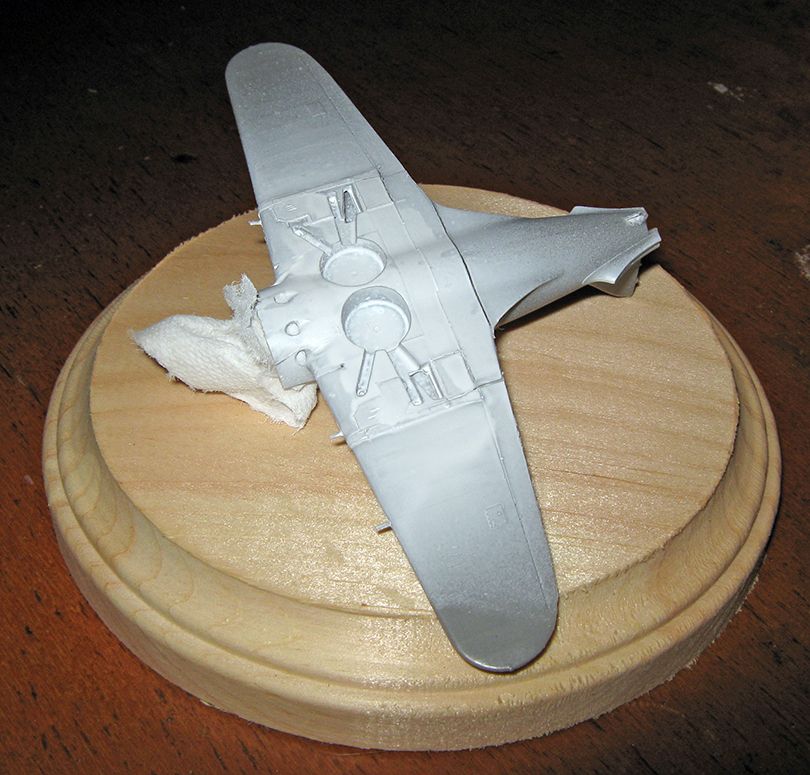 Now the cowl is assembled.... 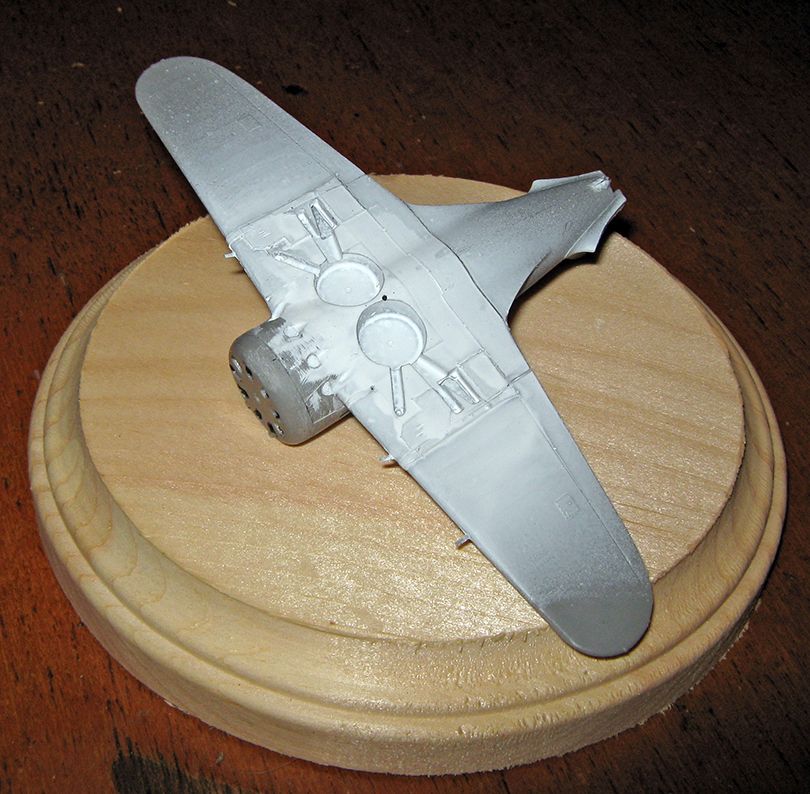 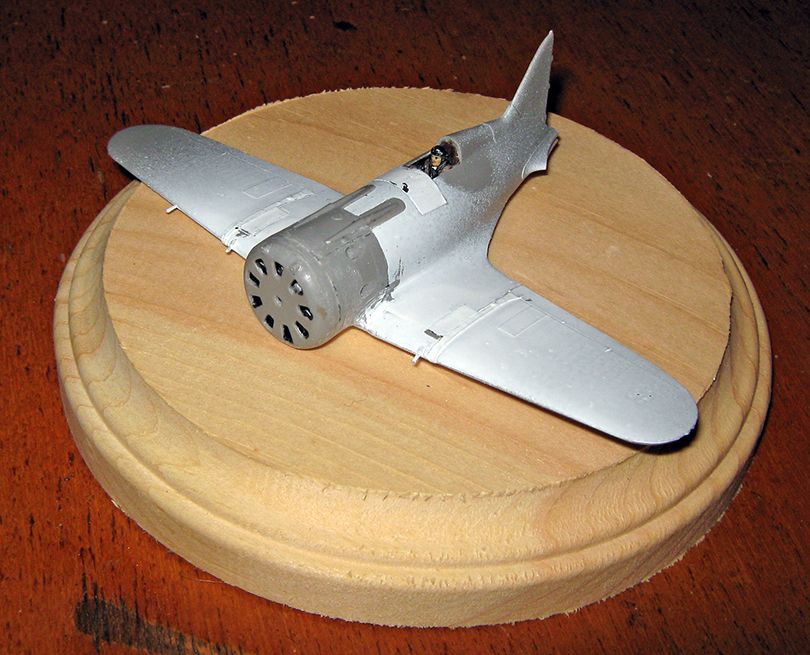 It all went together well enough. This is always a tricky bit. The exhaust ports are blanked off. I had to clip the extensions off the firewall piece. I skipped the whole engine mounting business, and just attached the front of the motor assembly to the face-plate. I have the 'T' intake on now, but no picture of it at the moment. From this point, this becomes just a straightforward assembly of the kit; the only conversion elements remaining are spinner shape and tail-skid. |
|
|
|
« Last Edit: December 30, 2015, 06:37:31 PM by Old Man »
|
 Logged
|
|
|
|
|
Massimo Tessitori
|
 |
« Reply #10 on: December 30, 2015, 09:02:04 PM » |
|
Hi Old Man,
so, you've faced serious fitting problems on the wings.
Please, copy and glue your post on the clone forum, this one could easily disappear on next days. I hadn't contacts with JP Myers and I've not any confirmation that he'll renew this domain.
Regards
Massimo
|
|
|
|
|
 Logged
|
|
|
|
Old Man
Newbie

Posts: 46
|
 |
« Reply #11 on: December 30, 2015, 10:31:44 PM » |
|
Done, Sir!
Thanks for the heads-up, much appreciated, and for the work you have done.
As I said, I feel pretty sure the problems with the fit were my own fault, and could be headed off by more care in fitting the cheek-pieces early. It wold probably also be possible to do the alterations in a slightly different order: fill the ski-wells and deal with the oil-cooler first, then attach the wing center to the fuselage and cheek-pieces, then put in the new exhaust outlets. This build is a sort of recce in force to see if this can be done; clearly it ca, but the best way to do it may be different than my first course....
|
|
|
|
|
 Logged
|
|
|
|
Old Man
Newbie

Posts: 46
|
 |
« Reply #12 on: February 26, 2021, 03:00:47 AM » |
|
I had occasion to take this one off the shelf recently, and decided to take it up again.  It stalled over trouble painting aluminum dope under-surface wing panels and fuselage. I had run out of my usual and could find no adequate substitute. Looking around here more closely than I had before, I noted there is evidence the Spanish painted over the delivery undersides with a decent sky blue. So I set about stripping the under-surfaces, of quite thick layers of paint. Since the upper-surfaces and markings were satisfactory, I didn't use Windex and a toothbrush, but sanded and scraped off the paint, down to primer and in spots plastic. Here is the thing halfway done...  I then painted everything a pale grey to even things out for the color...  And here it is with its sky blue belly...  Some touching up is needed at demarcations, but there really is not an awfully lot left to finish this, now that I can stand the look of the undersides. (edited for picture size, it surprised me how large they displayed) |
|
|
|
« Last Edit: March 04, 2021, 08:45:46 PM by Old Man »
|
 Logged
|
|
|
|
|
learstang
|
 |
« Reply #13 on: March 01, 2021, 02:03:50 AM » |
|
Nice to see you back to work on this one!
Regards,
Jason
|
|
|
|
|
 Logged
|
"I'll sleep when I'm dead."
- Warren William Zevon
|
|
|
|
John Thompson
|
 |
« Reply #14 on: March 01, 2021, 06:57:05 PM » |
|
Here is the heart of the conversion --- dealing with the differences in the underside of the nose between a 24 and a 10. The first thing I did was glue the lower cheek-pieces to the center-section piece. I may have given myself some seam-work in future by doing this, but I wanted to get the alterations done before the model was assembled. I sanded down the oil cooler tunnel to a proper profile for a 10; the plastic there is thick enough to handle this. I cut away the recesses for the skis from the inside, and squared the result away. Here is what was left:  The 'ski' openings are 4mm x 5mm (with a corner rounded), and the gap left where the rear of the oil cooler tunnel was is a little less than 4mm wide, and about 2.5mm deep. I cut bits of 1mm sheet to match each of the holes, bent them a little with a tweezers, and glued them in with CA gel. I leveled them to the interior surface. the bit that stood proud of the exterior I mostly whittled away whit a #10 blade, then sanded, both inside and out. This is very interesting - thank you for such a detailed presentation of your method! I've been working on a batch of I-16s lately; now I have some guidance on converting a type 10. Starting right now...  John |
|
|
|
|
 Logged
|
|
|
|
|


