TimSouthern
Newbie

Posts: 28
|
 |
« on: April 08, 2021, 10:08:11 PM » |
|
Hello everyone!
I am starting my 1/72 ICM Sukhoi su-2 build. I ordered the interior and exterior sets from Microdesign. Which should arrive here in Calgary, Alberta, Canada. By the end of the month. This give me lots of time to clean up the moldings and work on applying any detail that I can. My main areas of the build are the cockpit and the landing gear areas. I have found some great line drawings to help me along the way for the cockpit. But I have come up with little for the landing gear/wheel wells which are quite barren. So far I have a faint idea of what I need to do with adding ribs and runners to the fuselage. I know I need to create some type of fillers for the wings and also there's a floor running from the pilots bulkhead to the aft rib of the gunner/radio operators position. My confusion is with the windows that are on the bottom. In the kit the are just glued to the inside of the wing. But I feel that the windows would also be located in the floor as well as the wings. I can't see just windows in the wing/flaps and not in the floor. There would be so much turbulent air. So in need some clarification about how that area actually looks. Even though this kit is 20 years old and the moulding quality is a little rough, the overall fit and the rivet/fine detail is decent detail alone is wonderful. I feel with work and research I can make a beautiful little model.
Cheers
Tim
|
|
|
|
|
 Logged
|
|
|
|
|
John Thompson
|
 |
« Reply #1 on: April 09, 2021, 02:51:28 PM » |
|
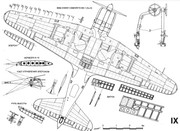
Does this help?  John |
|
|
|
|
 Logged
|
|
|
|
TimSouthern
Newbie

Posts: 28
|
 |
« Reply #2 on: April 10, 2021, 12:26:06 AM » |
|
Does this help?  John Hi John, It may, loos like my aeronautical engineering insight is correct. The glass was on the flaps which means the floor for the gunner must of ass well.... unless I am reading the profiles I have incorrectly. As the interior set by microdesign seems there was kind of a trough. As there was a trap door for a machine gun. It also helps with me trying to figure out where to place the missing circular windows. Seems my biggest issue is the wheel wells. After looking on Microdesigns website thier pictures of the interior set helps answer some of my questions. Cheers Tim |
|
|
|
|
 Logged
|
|
|
|
|
learstang
|
 |
« Reply #3 on: April 23, 2021, 02:04:59 AM » |
|
Good luck on your build! I have this kit, so I'll be interested to see how you do with it.
Best Regards,
Jason
|
|
|
|
|
 Logged
|
"I'll sleep when I'm dead."
- Warren William Zevon
|
|
|
TimSouthern
Newbie

Posts: 28
|
 |
« Reply #4 on: April 23, 2021, 04:37:52 AM » |
|
Hi Jason!
Well its a mixed bag. I'll be happy when it's time to paint it. The moulding detail is from impressive to bewildering. The moulding quality is in some places very poor. All these things have been voiced in online reviews as well as the sentiment with some effort a decent build should occur. The fur is quite good actually. I am still waiting for my exterior and interior sets from Microdesign in Russia. Last time I checked they had cleared Russian Customs and were in Poland. They are suppose to be here by the 30th. So I have just been spending time sanding and cleaning parts and doing what work I can as I wait. I added trigger buttons to the control column but after more research I didn't quite do them right and am going to redo them. I made support post for the seat. I also am adding the charging handle to the defensive machine gun. I am still fairly raw in my return to model building so I have ideas, try them and if they don't work I try something newer based on information I gain, then try again. The only area that is been challenging so far is deciding what to do about the landing gear wheel wells. There's very little info on how they look and only a few pics that I have found online that show a minute bit of the wells. In the pics I have seen they seem to be enclosed. Which makes sense. If they were left to be like on the Zvezda kit, or the ICM kit the amount of drag would be so much. The plane would never take off. Also the amount of pressure created would literally blow the wing panels off. Also from other aircraft of the time and information about aeronautical ideas and application's in Russia at the time; I feel safe in doing an enclosed wheel well. So I had to do all the work for that. So far it's going well. I want to redo some parts of the gear also as they are very basic. Especially the retraction struts. I'll take some pics of what I have done and read how to post pics on here as well as on my Instagram page. My only other concern is the canopy. My moulding is not very good. Its very distorted. I am not sure what I want to do. Try sanding it till it's somewhat clear? Or try Vacuforming it? Also there's a photo etch set by ACE from Poland that has the canopy framing and requires a thin clear accetate and go that way? Model Building owes me nothing. So I always accept that the kit infront of me is a canvas. My attitude and perspective of the build is how it will come out. You put in what you get out. If you let a kit get the best of you it's not the kits fault, it's the builders. In all honesty I am excited about the build and seeing what comes of it. I can tell you I have so much reference material now, what I want to present has expanded. I am very much pondering doing a very detailed engine and firewall detail job. Anyhow, back to the grind.
Cheers
Tim
|
|
|
|
|
 Logged
|
|
|
|
|
John Thompson
|
 |
« Reply #5 on: April 23, 2021, 05:35:00 PM » |
|
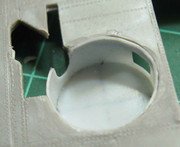
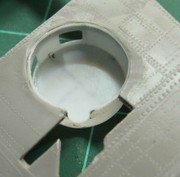
Well, here's someone else's rendition, if it's any help:   John |
|
|
|
« Last Edit: April 25, 2021, 03:13:13 PM by John Thompson »
|
 Logged
|
|
|
|
TimSouthern
Newbie

Posts: 28
|
 |
« Reply #6 on: April 24, 2021, 09:11:42 PM » |
|
Well, here's someone else's rendition, if it's any help:   Hi John, that is helpful, not too far off from what I cam up with. Its kinda funny, I have both books digitally and the manual and the landing gear area is the most poorly covered. Cheers Tim C John |
|
|
|
« Last Edit: April 25, 2021, 03:19:29 PM by John Thompson »
|
 Logged
|
|
|
|
TimSouthern
Newbie

Posts: 28
|
 |
« Reply #7 on: April 25, 2021, 11:07:49 AM » |
|
Well, here's someone else's rendition, if it's any help:   Hi John, that is helpful, not too far off from what I cam up with. Its kinda funny, I have both books digitally and the manual and the landing gear area is the most poorly covered. Cheers Tim C John Hi John, Actually after a lil more research I realized the landing gear travels through an arc as it rotates( fancy term for retract/extend) so that concept is spot on. I was not sure how things worked so I left an empty space. I'll fill that in now. I am guessing the openings are inspection panels. What site was this on? I feel this modeller has a much better grasp of that area than I do. Cheers Tim |
|
|
|
« Last Edit: April 25, 2021, 03:20:46 PM by John Thompson »
|
 Logged
|
|
|
|
|
John Thompson
|
 |
« Reply #8 on: April 25, 2021, 03:28:45 PM » |
|
What site was this on? I feel this modeller has a much better grasp of that area than I do.
No idea - I saved the images years ago. Possibly scalemodels.ru - you could try checking the Su-2 sub-forum there. That might be worthwhile; there's no telling what else you might turn up: http://scalemodels.ru/modules/forum/viewtopic_t_2941.htmlOr scroll down this forum - Sukhoi Aircraft Before 1950; check out anything with "Су-2" in the subject line: http://scalemodels.ru/modules/forum/viewforum_f_140.htmlBTW, I changed the images in my post to thumbnails; I took the liberty of doing the same to your quotations of my post for the sake of saving space. John |
|
|
|
« Last Edit: April 25, 2021, 03:47:05 PM by John Thompson »
|
 Logged
|
|
|
|
|
|
|
|
|


