|
Massimo Tessitori
|
 |
« on: August 15, 2021, 09:46:58 AM » |
|
Hi all,
after the completion of my Hurricane, I've started a LaGG-3 series 1-4 kit of ICM.
This kit gives contrasting impressions: on one hand, I see details of the finest quality in the cockpit area, landing gear, coolers and rockets, extraordinarily thin and clean trasparent parts and a wide choice of optional parts that suggest that kits of all versions, up to series 66, were previded by ICM; on the other hand, the fuselage has a mess in the area confining with the canopy, as if one has hurrily made works by hand and by eye on the mould. The openings of rear windows are not symmetrical on the fuselage halves, and the canopy rails are not aligned to the area where the sliding hood has to sit. A wide remodelling work will be needed on this area. Compared to this, the bad fit of the wings with the fuselage, particularly noticeable on the rear fillet, is simply routine work.
I had to choose the version before building; i am thinking to make the plane of Galchenko in the spring configuration, probably omitting the victory stalets that appear on a late photo where one can see modifications to the plane (or perhaps it was a new plane painted to match the earlier one).
For this plane, one has to choose the cowling with one front machine guns, not two as suggested by the instructions sheet: all photos show clearly the front left machine gun, but not anything similar on the right side. Besides the plane of Galchenko had a 12,7 mm UB firing through the spinner, not a larger gun; so I will have to cut the wide barrel, make a hole and add a thinner barrel protruding from it.
For what I know, this kit was boxed by Hasegawa in Japan. I wonder if the defects, particularly those in the canopy area, had been corrected before this.
|
|
|
|
|
 Logged
|
|
|
|
|
Massimo Tessitori
|
|
« Reply #1 on: August 26, 2021, 09:05:54 PM » |
|
I am quickly continuing this model. After the work on the canopy rails that was a bit delicate, the kit hasn't given serious problems till now.
I had to file the wing junction on the fuselage because it costrained the wing to a too small dihedral. Filling and sanding were contained in very reasonable amount. Some filing was needed to make the outlet flaps and the doors of the tail wheel thinner.
I had to build two small rectangles of plasticard to prevent to see through both rear windows; probably the light from one window created unpleasant reflections inside the other window on the real plane.
I made some work to make the fuselage behind the canopy a bit narrower and lower to position the sliding shield open; this requires a slight filing of the top of the rear wall; it is better to place the back armour with fuselage halves and rear wall already joined, after having refined their junction.
I had to modify (or rebuild, perhaps it's easier) the flap of the outlet of the water cooler, that had a different shape. To modify it, one has to cut the rear 'wings' and to lenghten all the piece of 1 mm.
Another thing is to drill the holes for waste shells, for the UB barrel, for the exhaust pipes etc.
I'm painting the model: the main colors will be airbrushed, but I'm considering to use a brush to make the repaintings of spring 1942, that were clearly made by brush on the real plane.
For the decals: I am to use the decals of the kit, but omitting the victory starlets: the only summer photo where they appear leaves some doubts about the configuration of the exhaust pipes and the lower counterweight of the rudder, that appear modified in a later photo of the plane during the winter 1942.
The box provides an amount of alternative pieces not to use; among them, a lot of thin rectangles of unknown use, that could eventually be used to help the scratchbuilding of some missing fins for the rockets.
|
|
|
|
|
Logged
|
|
|
|
|
learstang
|
|
« Reply #2 on: August 30, 2021, 01:53:04 AM » |
|
Sounds like a bit of work. This is in 1/48th scale? Can you post some photographs?
Best Regards,
Jason
|
|
|
|
|
Logged
|
"I'll sleep when I'm dead."
- Warren William Zevon
|
|
|
|
Massimo Tessitori
|
|
« Reply #3 on: August 30, 2021, 06:48:00 AM » |
|
It's nearly end now, I'll take some photos to show aside the Hurricane and Me-109.
Regards
Massimo
|
|
|
|
|
Logged
|
|
|
|
|
Massimo Tessitori
|
|
« Reply #4 on: September 01, 2021, 05:37:03 PM » |
|
Hi, the model is completed. It's not perfect, but I am pleased enough. 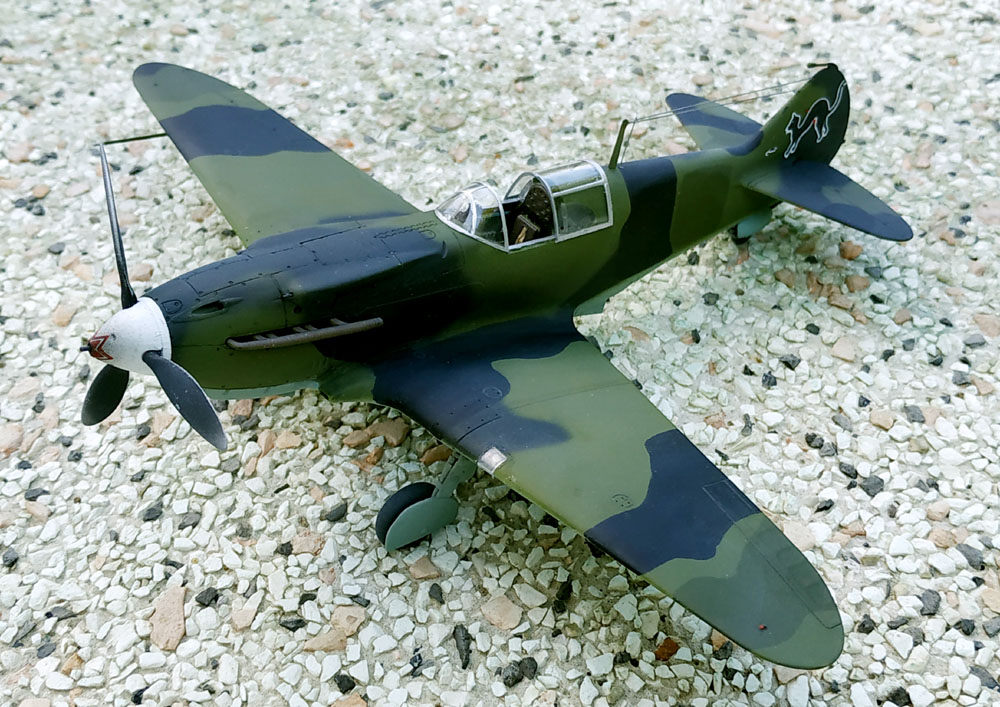 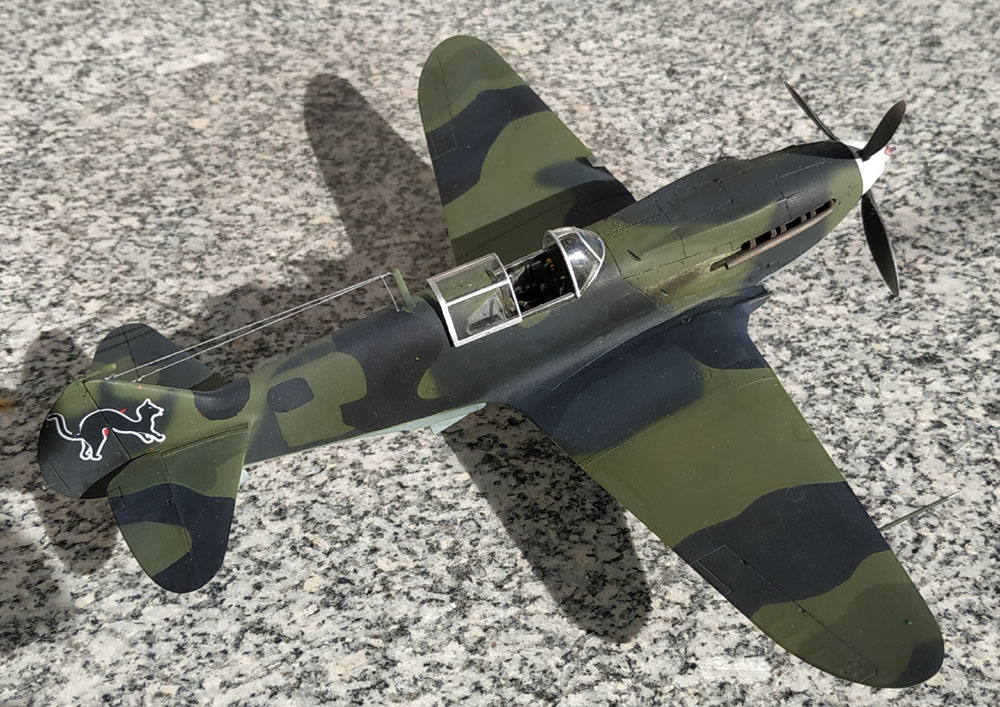 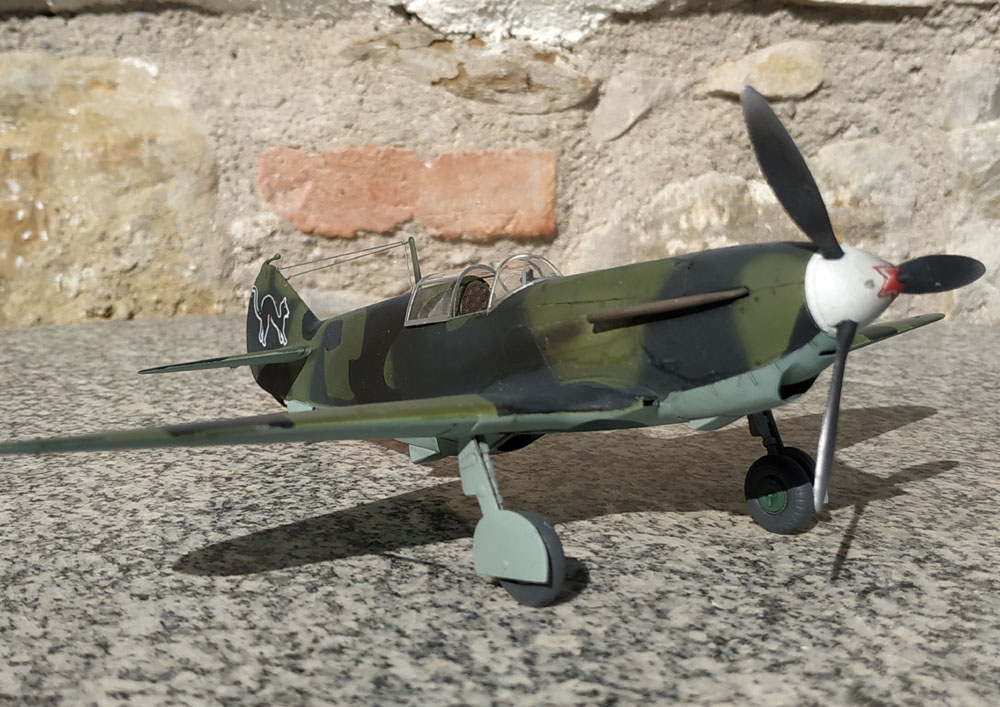  I've tried to reproduce the patchy painting of this plane; there is a first camouflage made by airbrush with faded colors, then a wide retouching by brush with fresh paint, particularly on the areas where the white of the winter camouflage had to be deleted in spring 1942. The identification of the colors, AMT or AII, is uncertain; I've utilized a H303 of Gunze as base green, NATO black of Tamiya for the sprayed camouflage, Russian tank green and black of Italeri for the brush repaintings. The undersurface was made with Tamiya light blue, that matches well the AII blue of AK; my idea is that the real AII blue should be a bit more saturated when new, but the plane was nearly one year old when portrayed and the Tamiya light blue worked well anyway. I have not utilized the victory stars because they appeared in a later timeframe when the plane was modified and is not well documented. It's the only image where the small hammer and sickle on the landing gear door appears, so I have omitted those included in the decals sheet for this version. Besides, the less ICM decals I use, the less problems I have. They were frail, and the black was not printed well centered. For the underwing positions, I've utilized the smaller stars because photos show them unusually small. A movie of this timeframe seems to show that there were not underwing stars, but they appear in photos taken before and after, so I used them. About the black-white cats: one has to remove the small mice in front of it on the right side of the tail; the mice was painted only on the left side. The decal of the star on the spinner was particularly hard, it broke and fragments had to be repositioned as possible, besides the out of center black outline was particularly noticeable. I would suggest to replace it with another star from another source, maybe only with the white-red outline forgettng the black one. Note that the real star painted on the plane of Galchenkp seems to have had unevenly spaced braces. Interestingly, one hasn't to use the star on the spinner if makes the plane of Galchenko as in winter 1941; in this case, the plane appears in a movie without the sliding hood and with a tape repair on the rear window. Now I see that, while the reproduction of the fabric effect on the tail is very good, the surface of the ailerons let see the inner structure too much, it should be painted with thick paint and sandpapered to become smoother. Note the reworked cooler outlet flap, the small MG barrel from the spinner, the panels inside the rear windows etc. On the whole, I consider it a good enough model. To make a comparison with another recently built kit, the Hurricane Mk II of Hasegawa required much more sanding work and the complete scratchbuilding of the carburettor inlet. |
|
|
|
« Last Edit: September 02, 2021, 07:06:07 AM by Massimo Tessitori »
|
Logged
|
|
|
|
|
John Thompson
|
|
« Reply #5 on: September 02, 2021, 02:22:57 PM » |
|
Looks excellent to me, Massimo! I like the way you've weathered the exhaust stacks - they look quite realistic.
John
|
|
|
|
|
Logged
|
|
|
|
|
Massimo Tessitori
|
|
« Reply #6 on: September 02, 2021, 02:46:25 PM » |
|
Hi John,
it is a mix of gun metal, brown and a bit of gold. I don't know if it is good on all planes. I wonder what is the metal of which they are made, I suppose that it is some inox steel darkened by internal heat. I made a slight black wash with Tamiya panel enhancer.
Massimo
|
|
|
|
|
Logged
|
|
|
|
|
learstang
|
|
« Reply #7 on: September 03, 2021, 01:38:59 AM » |
|
Excellent job on that LaGG-3, Massimo! I think you did a good job of representing the various re-paintings of the aircraft.
Best Regards,
Jason
|
|
|
|
|
Logged
|
"I'll sleep when I'm dead."
- Warren William Zevon
|
|
|
|
Massimo Tessitori
|
|
« Reply #8 on: September 03, 2021, 06:27:19 AM » |
|
Hi Jason,
I know that it doesn't fit the today's taste in painting and weathering models, but I think that the reproduction of a brush-repainted plane is accurate enough.
Massimo
|
|
|
|
|
Logged
|
|
|
|
|
66misos
|
|
« Reply #9 on: September 04, 2021, 11:57:05 AM » |
|
Hi Massimo, very nice kit, also original plane looks pretty clean and polished. And yes, camo field have sharp edged like painted by brush. You got it very well. However, when looking at photos from http://massimotessitori.altervista.org/sovietwarplanes/pages/lagg3/galachenko/galachenko.html I would have some remarks: 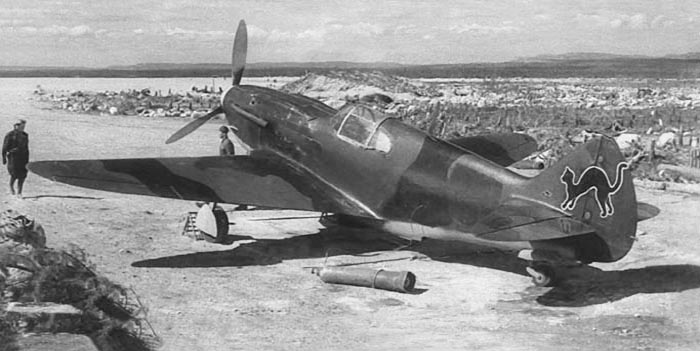 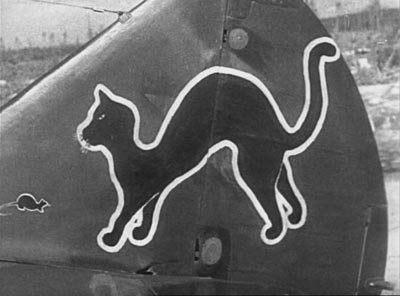 . - I think you missed two repaired/ALG-1(?) blotches at the horizontal stabilizer, - red star seems to be overpainted with green, although star partially shines under the green color, - to my eyes only moving part of the canopy framing is in NMF (peeled green paint?), while framing on the wind shield is still in camo color. You have all that done at your profile: 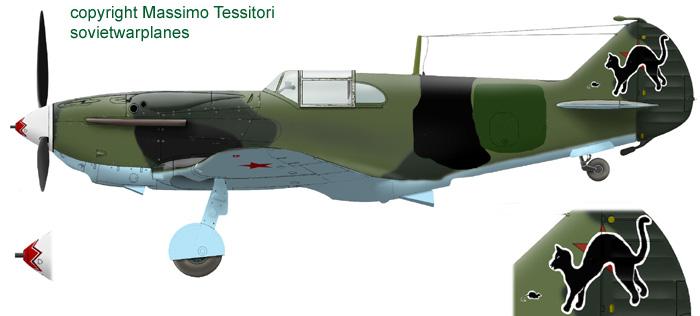 IMHO this thread would have a better, more appropriate place in the Model Kits section http://massimotessitori.altervista.org/sovietwarplanes/board/index.php?board=7.0. What do you think? Regards, 66misos |
|
|
|
|
Logged
|
|
|
|
|
Massimo Tessitori
|
|
« Reply #10 on: September 04, 2021, 12:19:51 PM » |
|
Hi Misos, thank you for your post. I am happy that you like my model.
You are perfectly right about the color of the frame and the hinge covers put into evidence by the photos and my own profile. Perhaps I'll find the courage to modify it, but I feel that take into hands a model that was considered completed is very risky for one's nerves in case of any accident.
I prefer to keep the post in the LaGG-3 section, it is more in order if the planes are divided by type, in my idea.
Best regards
Massimo
|
|
|
|
|
Logged
|
|
|
|
|
66misos
|
|
« Reply #11 on: September 04, 2021, 01:32:04 PM » |
|
Hi Massimo,
I know it. When I declare that the kit is finished I have no motivation to work on that kit anymore.
Regards,
66misos
|
|
|
|
|
Logged
|
|
|
|
Holger
Newbie

Posts: 11
|
|
« Reply #12 on: October 08, 2021, 04:13:47 PM » |
|
Hello, it turned out to be a very nice model! I am now also starting to build a LaGG-3 from ICM on a scale of 1:48. My question would be: "How did you design the inside of the cockpit? There are a lot of interpretations, from completely gray to silver to primer, greenish primer, black / dark gray primer ....... just like it is already described on your website. " Which option of coloring in the cabin did you choose  After studying all the documents, the machine appears to be a hybrid, with features from different series, possibly shortly before the War built One could assume that they were still working exactly according to regulations, what the painting in this one Case concerns cockpit painting? And no improvisation Where would you lean as a recommendation to paint the inside? Thank you in advance, mfg |
|
|
|
|
Logged
|
|
|
|
|
Massimo Tessitori
|
|
« Reply #13 on: October 09, 2021, 02:28:30 PM » |
|
Hi Holger,
the painting of the cockpit was chosen on the base of bw photos, not always consistent, and similar types.
I think that the cockpit walls are painted silver on the base of inside photos of LaGG-3; on this base, I think that the instrument panel was painted AE-9 light grey, something compatible can be seen on general photos of La-5s.
About the seat, I am in doubt. Some photos of the plane of Galchenko seems to show a dark seat or at least backrest. Other photos seem to show a light color around the headrest. Photos of factory of LaGG-3 seems to suggest a light color, could be AE-9. MiG-3 backrests are believed to be green.
For the inside of fuselage behind the seat, I think to have seen both black and silver (apparently of course) in the radio bay with the side hatch open.
Photos of Galchenko's plane inflight (with one leg down) seem to suggest that the main parts of the landing gear bay were as the outside.
Of course, I can't affirm that this interpretation is right, nor that they all were in the same way.
Have you found photos of inside the cockpit?
An unification of inside colors should have been promoved later, in 1942 I think.
Regards
Massimo
|
|
|
|
|
Logged
|
|
|
|
Holger
Newbie
Posts: 11
|
|
« Reply #14 on: October 09, 2021, 05:39:21 PM » |
|
Hi there, Thank you for your prompt reply...., yes, the photos of the cockpit, I have all the descriptions ... of course, everything is very contradictory ... I think I tend to prime the inside of the cockpit in a green, similar to primer ALG-5, then paint / spray it with silver the backrest / seat in gray A-14 with color gradations, Back and headrest in leather. and primed black behind the backrest and also painted with silver. To do this, trace and highlight the structures. My question would be: the painting of the floor ? also ALG 5 primer and then silver or more wood-colored ?? what would you tend to do ? mfg Holger |
|
|
|
« Last Edit: October 09, 2021, 05:42:08 PM by Holger »
|
Logged
|
|
|
|
|


