Deprecated: preg_replace(): The /e modifier is deprecated, use preg_replace_callback instead in /membri/massimotessitori/sovietwarplanes/board/Sources/Load.php(225) : runtime-created function on line 3
1/48 MiG-3- early work
Sovietwarplanes
April 25, 2024, 12:52:33 AM *
Welcome, Guest. Please login or register.

Login with username, password and session length
News: This forum replaces the old sovietwarplanes.com whose domain has expired in January 2017. It has been updated with the posts of the year 2016.
The new location of the site 'Sovietwarplanes pages' is at http://massimotessitori.altervista.org/sovietwarplanes/pages/
 
   Home   Help Search Login Register  
Pages: [1]
  Print  
Author Topic: 1/48 MiG-3- early work  (Read 6559 times)
jkiker
Newbie
*
Posts: 16


« on: October 31, 2007, 04:02:26 AM »

Hi all,

Here are a couple of pictures of my 1/48 scale Trumpeter MiG-3 in the early stages of work; these are about a week old so some more work has been done.  The first pictures shows the revised early exhaust fairing on one fuselage half, with the other half showing the kit configuration.  The second one shows an ICM cockpit tubing piece being fitted into place, with ribs and stringers on the inside of the fuselage behind it.  I will be using the Eduard photoetch set made for the ICM kit for a lot of cockpit parts, and I am making a new, wider instrument panel and a revised rear shelf.

And now for another question for the MiG-3 boffins.  I see in pictures of the 1/32 scale Trumpeter kit that when it is finished, it looks to me like the nose sits too high off the ground.  I think the 1/48 scale kit will be the same.  Do my eyes deceive me, compared to pictures of the real airplane?  I think the kit struts will need to be shortened at least 1/32 inch (1mm) in my kit.  Can anyone advise me if I am correct or incorrect?

Thanks in advance and cheers, Jim

[/img]


[/img]
Logged
Massimo Tessitori
Administrator
Hero Member
*****
Posts: 6528


« Reply #1 on: October 31, 2007, 02:00:37 PM »

Hi Jim, Smiley
your model looks well made, thank you for posting the images.
Only a doubt about the position of exhaust pipes: are you sure that they fit after closing the hole of their (wrong) late style cowling? I know that the position of the exhaust pipes should be the same in both versions, but the late type has a void of about 10 cm after the pipes due to the moved back division line between the panels of cowling. If you close all the space on the front, won't it be necessary to move back the pipes?
Massimo
Logged
marluc
Sr. Member
****
Posts: 418


« Reply #2 on: October 31, 2007, 10:14:34 PM »

Hello Jim:

You?re making a very nice work in that cockpit,congratulations.The structural frame,is from the ICM kit?
Regarding your "nose too high" question,you could compare the landing gear legs against a scale plan,I made the same with the Eduard I-16 and got to shorten them.Thanks for sharing this images,best regards:

Martin
Logged
jkiker
Newbie
*
Posts: 16


« Reply #3 on: November 01, 2007, 12:33:53 AM »

Thank you, gentlemen,

Massimo, I was afraid that that picture of the exhaust shroud would not be clear enough; I will take another which will show the work better.  The kit's exhausts go in the same place.  The shroud I made has a thin metal piece (from a PE set) that was cut and bent into a "U" shape, then glued into place over the front exhaust but with the front end going into the fuselage.  A piece of plastic was then added into the front portion of the cutout.  However, the thin metal tranished and turned dark from handling in my fingers, so you cannot see the opening.  Another picture will bring it clear.

As for the landing gear, while I have most of the MiG-3 information from the site saved, a scale drawing printed out is something I lack.  I do think the main gear is too long for an airplane on the ground, but would like to have further confirmation if anyone can supply it.

And for Marluc, yes indeed.  Much of the cockpit "cage" structure comes from the ICM kit.  More to come!

Thanks and cheers, Jim
Logged
jkiker
Newbie
*
Posts: 16


« Reply #4 on: November 26, 2007, 04:32:11 AM »

Hi all,

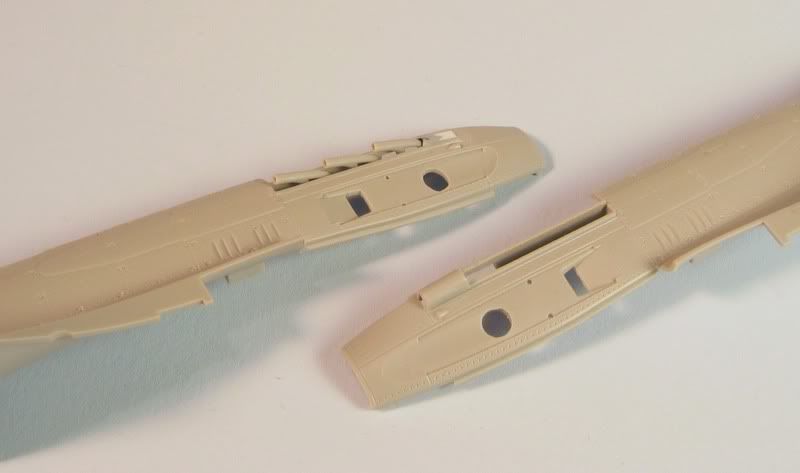
It has taken longer but I now have some work in the cockpit and some additional fit improvements to share.? First up, Massimo asked for a better picture of my fix for the early MiG-3's exhaust fairing.? I think this is a better view.


The new interior bits are set into place here.? The ICM kit contributed the side and back tube assemblies.


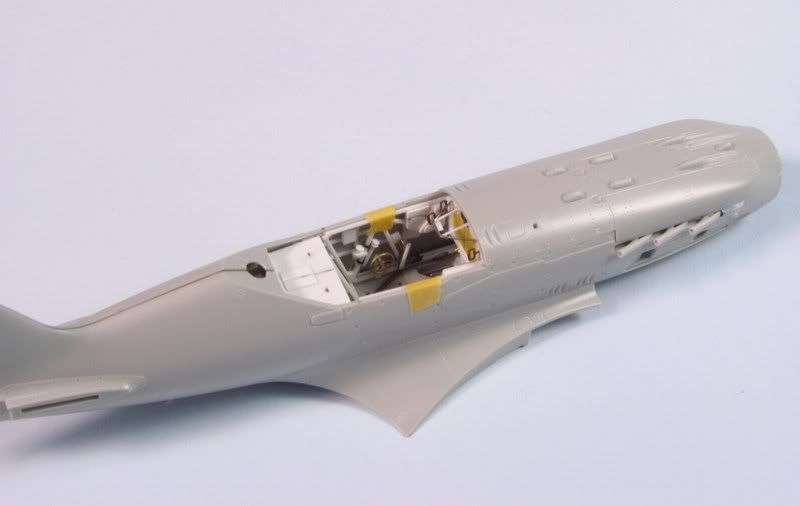
And here is an exploded view.? The cockpit is not complete, but well along.? The instrument panel and rear shelf are scratchbuilt pieces; the Eduard PE set will lend the main instrument cluster (there is tape over this area, so that a white surface will be there after painting for the instrument faces) and most of the pull handles.? The trim wheels are from model rail road pieces in brass.? All of the fuselage inside structure, the additional boxes, and the support structure for the gunsight are scratchbuilt.


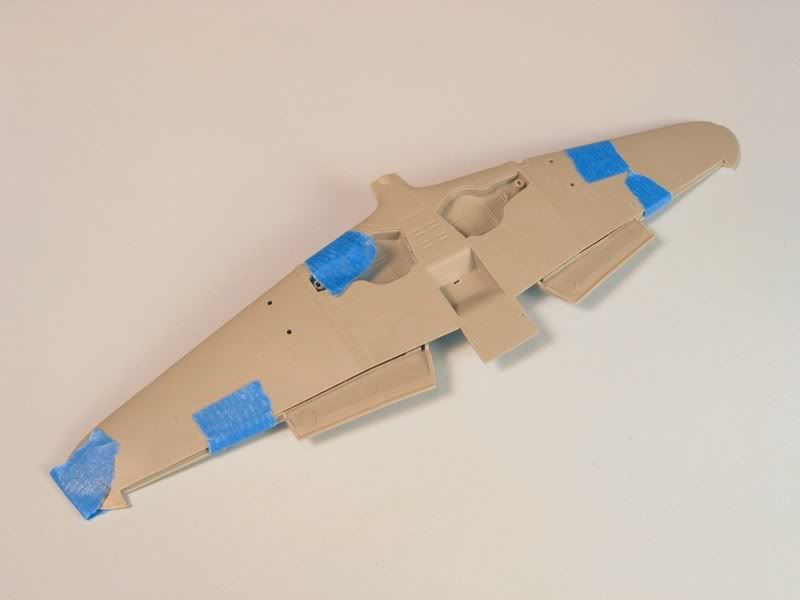
Finally, I noticed that the wings didn't line up well at the trailing edge, where the flaps and ailerons will mate.? I trimmed some off of the mounting pegs to slide the top wing forward about .010".? Note- the fit of every kit is a bit different.? I drew on some Sharpie on the edges to show before (left) and after (right).


By all means, I am interested to know what you think and if anything is not right.? The seat and some additional details remain.

Cheers, Jim
« Last Edit: December 03, 2007, 04:43:57 AM by jkiker » Logged
Massimo Tessitori
Administrator
Hero Member
*****
Posts: 6528


« Reply #5 on: November 26, 2007, 07:36:58 AM »

Hi Jim, it looks a great work!  Smiley
Should I look for something... well, on the photos of the model it looks that the division line between wing ad aileron on upper and lower surface are aligned. On the real plane, the line on the uppersurface was slightly moved backwards in comparison to the undersurface.
Massimo
Logged
jkiker
Newbie
*
Posts: 16


« Reply #6 on: November 27, 2007, 02:00:29 AM »

HI Massimo,

You are quite correct and it is a good point.  My picture does not show the improved line quite as well, but rest assured that there is still the edge of the top wing that sits farther back than the bottom edge.  This is correct, since the aileron's top leading edge sits farther back than the bottom edge.  So they will still fit correctly; I have adjusted the fit only of the two edges that are glued together.

Thanks for asking, and I am glad you like it so far!

Cheers, Jim
Logged
Massimo Tessitori
Administrator
Hero Member
*****
Posts: 6528


« Reply #7 on: November 28, 2007, 02:01:42 PM »

Hi Jim, Smiley
you are welcome. Thank you for posting the images of your good work.
Massimo
Logged
Pages: [1]
  Print  
 
Jump to:  

Powered by MySQL Powered by PHP Powered by SMF 1.1.11 | SMF © 2006-2009, Simple Machines LLC Valid XHTML 1.0! Valid CSS!