|
marluc
|
 |
« Reply #45 on: June 15, 2011, 12:34:40 AM » |
|
Thanks John for this WIP,the tips are very useful for my AMTech P-40E,it will be a Klimov engined bird.Greetings.
Martin
|
|
|
|
|
 Logged
|
|
|
|
|
JP
|
|
« Reply #46 on: June 18, 2011, 03:38:57 AM » |
|
I am currently dealing with the fact that the rear windows on my P-40 cracked. I also cracked a second set from another kit just clipping them off the sprue because the plastic is so hard and brittle. I'm not sure what I can do as I now have no back windows for my aircraft.  In the meantime, I found this video. P-40s going to Russia through Iran. This might explain why there was usually no overpainting seen on these planes. http://www.criticalpast.com/video/65675050206_Borghi-Airport_P-40-aircraft_A-40-aircraft_A-20-aircraft_A-36-aircraftAt about 1:13 you can see a K enter the frame. |
|
|
|
« Last Edit: June 22, 2011, 03:05:43 PM by JP »
|
Logged
|
|
|
|
|
Massimo Tessitori
|
|
« Reply #47 on: June 18, 2011, 07:34:41 AM » |
|
Hi John,
what a frustrating situation. I don't think that you will buy a third one, isn't it? This publicity for the AMT kit is terrible.
Maybe you could rebuild them from clear plastic sheet. The frames could be made simply with the thickness of paint, if you mask and spray them.
Regards
Massimo
|
|
|
|
|
Logged
|
|
|
|
|
JP
|
|
« Reply #48 on: June 18, 2011, 09:50:04 PM » |
|
From our old friend Mario Holly over at HyperScale: "This profile in AML sheet originates with Russian artist Mikhail Bykov who is known for doing quite decent research. Czech language book featuring the same profile states that archival photographs, and other documents, were used in cooperation with gen.Denisov." Anyone have more information on these details? Massimo - no, I will not buy a third. I'm trying to contact the Hobbycraft company, since they now sell these kits, and ask about having a few sets of replacement parts. I didn't do all this work to end up with an incomplete kit that I could never finish. But now I have two kits in this situation.  If I can find some suitable clear plastic sheet, it may be better to make my own. In any case, with all the problems, the Amtech P-40K kit really should be considered a short-run, multi-media kit in the truest sense like some of the Fonderie Minature kits. I can't think of any part that actually just went to together and didn't require a lot of work.. |
|
|
|
« Last Edit: June 19, 2011, 01:48:28 AM by JP »
|
Logged
|
|
|
|
|
JP
|
|
« Reply #49 on: June 19, 2011, 09:38:11 PM » |
|
This is very funny. The flaw in the original window piece was a distortion because the piece had been bent. I had nothing to lose, so I put it in the oven on low heat, and the distortion is gone! I still have one ruined set of glass and therefore a second kit I can't build, but for now, I can resume building this monster.  |
|
|
|
|
Logged
|
|
|
|
|
Troy Smith
|
|
« Reply #50 on: June 25, 2011, 07:48:31 PM » |
|
This is very funny. The flaw in the original window piece was a distortion because the piece had been bent. I had nothing to lose, so I put it in the oven on low heat, and the distortion is gone! I still have one ruined set of glass and therefore a second kit I can't build, but for now, I can resume building this monster. Hi JP Maybe not as bad you think, Now IIRC the AMT kit is the basis for the Italeri rebox P-40M/N kit, which has two sets of canopies, as the N model has the new greenhouse rear section. quick check... http://www.hyperscale.com/2007/reviews/kits/italeri2658reviewbg_1.htmYep, That means the P-40 M canopies is spare, and so are the rear window panels.... I'm looking at doing P-40 N so may have these spare, but where in the world are you? let me know cheers T |
|
|
|
|
Logged
|
|
|
|
|
JP
|
|
« Reply #51 on: June 25, 2011, 08:33:24 PM » |
|
That's very good news. Must be a marketing ploy by Italeri to get people to buy their kit! I got your message and will answer you there.
BTW, be careful when cutting the clear parts off the trees. The plastic on the two sets I ruined looks very good, but four times in a row when I clipped the part, the attachment point split and this split went up into the part itself.
|
|
|
|
« Last Edit: June 27, 2011, 08:54:42 AM by JP »
|
Logged
|
|
|
|
|
JP
|
|
« Reply #52 on: June 26, 2011, 01:59:27 AM » |
|
So I'm waiting on some clear parts and some Eduard masks so I don't have to cut on the clear parts I just treated with Future because I'm worried the tape will peel off the future. So I decided to put the wings on, since I have to do that anyway, and I can't figure out why I can't make the wings align evenly. Then I notice this: 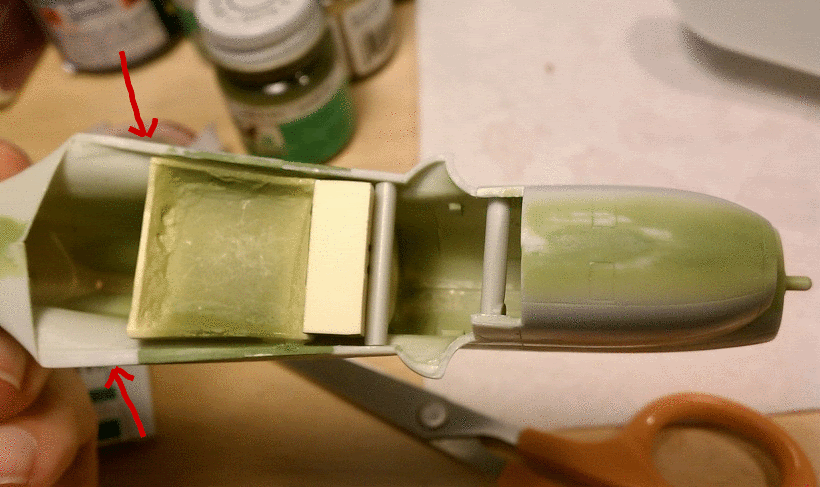 The two edges of the fuselage where the wing goes on are totally different! The top edge is narrow and tall, and the bottom edge is flat and shallow. So the wing not only doesn't center, it sits too high on the starboard side. Another correction underway! And as bad as it seems, I have to admit I'm kind of enjoying beating all the challenges this kit is throwing at me.  |
|
|
|
« Last Edit: June 26, 2011, 08:06:51 AM by JP »
|
Logged
|
|
|
|
|
Massimo Tessitori
|
|
« Reply #53 on: June 26, 2011, 07:55:59 AM » |
|
Hi John,
I suppose that the second kit will go directly in the scrap box.
Regards
Massimo
|
|
|
|
|
Logged
|
|
|
|
|
JP
|
|
« Reply #54 on: June 26, 2011, 09:01:22 AM » |
|
I'm going to hold onto it in the belief that perhaps this current kit is the result of some heat damage or something. For sure I won't do another AMT P-40 right after this. I won't even finish that Hasegawa P-40 next, since it will require as much sanding and rescribing, even if it is not warped or badly molded. Maybe a nice Lend-Lease 1/48 Tamiya Spitfire Vb. That should be quite a treat.
|
|
|
|
|
Logged
|
|
|
|
|
JP
|
|
« Reply #55 on: June 27, 2011, 06:51:23 AM » |
|
Ok, so the canopy masks are ordered and on the way. I tried cutting my own, but it didn't work out. In the meantime, I got the wing all set up and glued on. I was holding the wing by hand to dry the glue, but it became apparent after 20 minutes of this that it would need more time to dry. Mostly because my wing was naturally flat and I was attempting to add dihedral. So I set up some old Russian textbooks to help me out. Nice floppy soft cover ones are great because when you put the one on top, it flops over instead of sliding off. 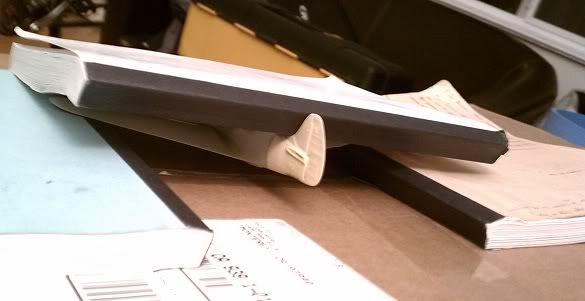 Anyway, I'm going to leave it this way overnight just to be sure. I wouldn't want to get to eager to go on and have a wing root crack open! Perhaps while I wait, I'll start sanding on that Hasegawa kit. It went together badly, I'm afraid. I have heard some people proclaim it as "unbuildable". It's not that bad, but it is definitely NOT what you expect when you buy a Hasegawa kit. For reference, this http://www.rollmodels.net/nreviews/airplanes/48hasep40e/48hasep40e.php is the best article I have found regarding how to overcome the main fit problems with this kit. The key is the plastic strip to space the spine behind the cockpit. I missed this and now I have a terrible fit for that part. I think I will score the seams with a knife and try to break the pieces apart and try it again. EDIT - Success! The left side of the spine was glued on first, and so it fit well. The second piece left a horrible step at the back seam because I didn't realize Hasegawa had poorly designed these parts. I managed to break off the piece that was very bad and correct this. Red arrow points to strip of plastic used to correctly space these parts. 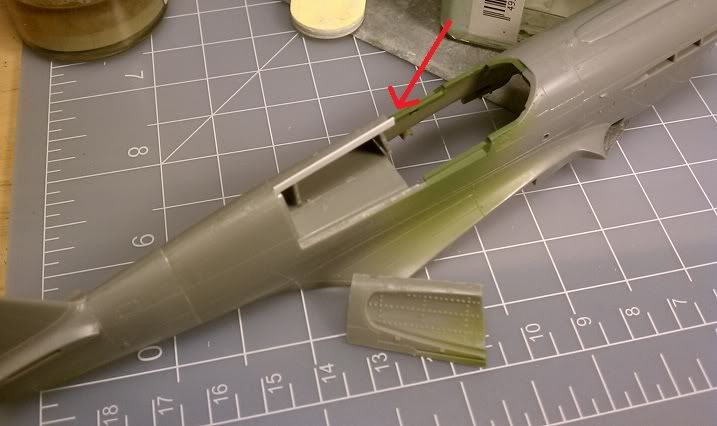 Here you can see there is no large step at the back seam anymore, with a light shining from behind to highlight. Red arrow points to where a very large step used to be. 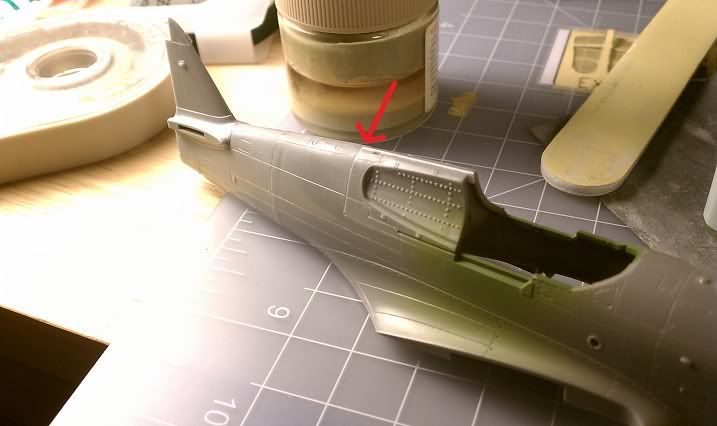 |
|
|
|
« Last Edit: June 27, 2011, 08:34:55 AM by JP »
|
Logged
|
|
|
|
|
Massimo Tessitori
|
|
« Reply #56 on: June 27, 2011, 09:16:23 AM » |
|
Hi John,
it looks that one has to face unsatifactoy kits in every scale to obtain a model of this important plane. Such fitting difficulties would be unexpected for any kit. However, they look to be resolved now. Thank you for your fine report.
Regards
Massimo
|
|
|
|
|
Logged
|
|
|
|
|
AC26
|
|
« Reply #57 on: June 30, 2011, 05:25:17 PM » |
|
So I'm waiting on some clear parts and some Eduard masks so I don't have to cut on the clear parts I just treated with Future because I'm worried the tape will peel off the future. I'm also not a great fun of the Future/Klear/Whatever. Instead, I polish my canopies with Tamiya polishing compound or equivalent stuff. This doesn't add a thin film of the lacquer to the canopy. Try this! Cheers, AaCee |
|
|
|
|
Logged
|
|
|
|
|
JP
|
|
« Reply #58 on: June 30, 2011, 05:34:48 PM » |
|
So I'm waiting on some clear parts and some Eduard masks so I don't have to cut on the clear parts I just treated with Future because I'm worried the tape will peel off the future. I'm also not a great fun of the Future/Klear/Whatever. Instead, I polish my canopies with Tamiya polishing compound or equivalent stuff. This doesn't add a thin film of the lacquer to the canopy. Try this! Cheers, AaCee I think I will. I'm also not very happy with my Squadron modeling putty, so I may try the Tamiya stuff. The Squadron putty is far too granular (for me, and I have both the green and the white)and dries very lumpy. This makes it much more work to try and fill a seam, because now I have to also try and even out the putty. And frequently there are spots in it where I knock out one of the grains of sand that seems to be in the stuff. Strangely, the best putty I ever used was some basic Testors putty I found in St Petersburg. It was the only stuff I could find at the time. But it was very thin and there were no grains of sand in it When I put it on the model, it was liquid enough to settle into the seams and dry flat, but not run or drip. It was perfect. I bought a tube of it here in the states, but it is not the same. |
|
|
|
|
Logged
|
|
|
|
|
learstang
|
|
« Reply #59 on: June 30, 2011, 06:29:36 PM » |
|
I try and stay away from putty at all costs. There have been too many times where I was sure I had allowed it enough time to dry (a month or more) and had sanded the seam perfectly smoothly only to see it reappear a few months later as the putty continued to dry and contract. For that reason, I normally fill in small seams with Testors glue - it dries smooth and hard, and it also strengthens the joint (if it's resin I use CA glue for the same effect).
Regards,
Jason
|
|
|
|
|
Logged
|
"I'll sleep when I'm dead."
- Warren William Zevon
|
|
|
|


