|
Model by Massimo Tessitori |
|
|
|
It is well known that none kit of I-153 now available is accurate. Besides,
there are unconfirmed voices of possible future releases of kits by Valom
and/or ICM. So, I decided to build this one of Heller/Smer in a relatively
relaxing way, correcting only those defects that are easily recognizable
by an eyesight and comparison with photos.
Smer has an hi-tech version too of this kit with some photoetched additions,
resin skis, bombs and drop tanks and beautiful decals for Soviet white-mottled
and Finnish planes.
From reviews, I have to say that I expected a by far worse model. The
work was pleasant enough.
Here are my modifies:
Cockpit
Some details were added inside the cockpit, even if it's not become
a great marvel all the same. The most important work is to separate the
back part from the bottom part of the seat, and rebuilt the armoured back.
Some struts, pedals and guns wrere added inside the fuselage; from
the photos of Bourget, it looks that the most of inner surfaces was painted
dark grey, while the instrument panel was very light grey. Brown leather
protections can be reproduced with thick brown paint on the edges of the
side doors, of the fuselage in front of the pilot, and on the rear of the
gunsight (to be scratchbuilt).
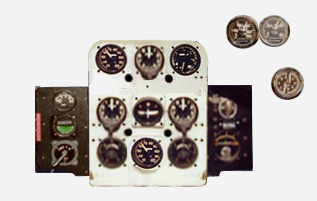 |
The instrument panel has been obtained from scans of photos, fitted
to 1/72 on a scanned shape of the piece of the kit and printed on photo
paper, cutten and glued. Although being flat, the result is interesting
and quick.
Here is the flat image that I've obtained from photos of the plane preserved at Bourget. Note that instruments covered by the cloche or other things were replaced with copies of other instruments, but this is not important for the final effect. Probably one can obtain a better work on the base of screenshots of some flight simulators. When printing, take in mind that this drawing has a resolution of 600 dpi |
An aiming device and two small holes to give light to the interior were
added under the windshield. A small rod should pass through the glass to
sustain an aiming circle, but I've omitted the detail because it's too
risky to drill the winshield.
I've utilized the windshield of the kit, but it's somewhat thick, and
perhaps I'll replace it with a vacuformed one available on a Clear-vac
set.
Fuselage
The fuselage is about 2 mm too long, but I preferred not to try this
correction; I think that the model, as it is, gives an acceptable impression
when compared to photos. I've just corrected the profile between the humpback
and the stabilizator by a small amount of filler.
Note that some holes have to be drilled in the fuselage sides. In particular,
the wires from the lower part of the fuselage should come out from holes
at different heights, that don't appear as aligned when seen from the front.
Nylon wires were inserted and glued to anchors inside the fuselage
before joining the halves, and then into holes in the wing surfaces according
to photos and to the instruction sheet; the extremity of wires passed between
the wing halves and protruded from the edges to be tensioned. After gluing,
drying, sanding the wingroots, the wires were tensioned, blocked with cyanoacrilate,
cutten and filed. The result was convincing and strong; now I have no more
fear to make wiring in biplanes.
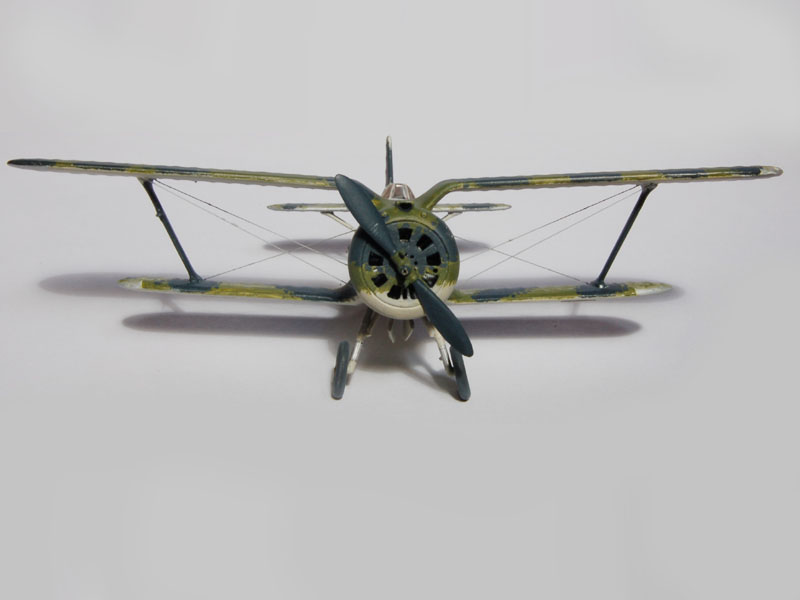
Engine cowling
The engine cowling was filed on its sides to delete the large step of
the mould junction line; then, oblique holes were made for exhaust stacks.
Note that their positons on the cowling are slightly asymmetrical.
The engine front plate was modified to move outwards the holes: I reduced
them about 0,5 mm by gluing plastic stripes on their inner side, and enlarged
them removing their outer part. Then I glued it on the cowling, and refined
the junction.
At the end, I had to drill 2 oval holes on its lower and left part
(some planes had only the central hole, many had another one on the left,
some had it on the right too. I don't know if this is related with the
engine type, that can be M-62 or M-63 according to the production batch).
Later, after having painted the model, small obliquely-cut exhaust
pipes were inserted; after this, they were cut parallel to the cowling
by a razor blade. Some clear varnish, used as glue, improved their stability
before the final clear matt layer.
I've added an engine advanced from an Hasegawa I-16, that remains barely
visible through the opened slots. Once glued inside, check that its hole
is aligned with that of front plate, and widen it slightly to fit the propeller's
shaft.
Sometimes, in the summer, the front plate was removed to to improve
the engine cooling. If so, the addition of the engine becomes essential,
and probably the engine of an ICM I-16 is better than the simplified one
of Hasegawa.
Propeller
About the propeller: I had to rebuild a longer starter tooth by a brass
pipe, glued into a hole drilled on the original hub. The propeller blades
were slightly modified according to photos, and their balances added.
Please, note that the propeller of rebuilt flying planes is somewhat
different from wartime ones, so their photos can't be utilized as a reference.
Note that, aside uncovered hubs, the I-153's propellers can bear two
types of spinner: a wider one, similar to that of I-15bis and rather rare
(perhaps utilized on the prototype only), and a smaller one, that is lacking
in the kit and could be reproduced by modifying the nose of some bomb,
if required.
Wings and tailplanes
The profile of the tips of wings and tailplanes has been modified according
to the best available drawings; I didn't reduce the chord of these surfaces,
although being excessive of 1 mm, to avoid complications with their fitting
to the fuselage. So, I didn't modify the ailerons and elevators division
line, although being somewhat unaccurate.
The leading edge of wings should be metallic, so I've deleted part
of the fabric surface nervures of the kit and traced straight trasversal
division lines with a cutter, as visible on many scale drawings.
The heaviest work of all the model was to correct the shape of wheels
bays (that has to be circular even if the doors are oval), to add depth
and to close them, taking into account that the closures haven't to interfere
with the lower wing joint. At the end, I managed to obtain a fair work
by thin plasticard, cyanoacrilate and file. The model has the pitot probe
on the wrong wing strut; I've removed it and rebuilt it on the right side.
When the wing is mounted on and bended to the right dihedral, the wingstruts
reveal to be somewhat short. They have to be prolonged by 0,5 mm with plastic
on each tip. It's not necessary to shape accurately the addition, because
it'll disappear inside the holes on the wings.
Two metallic plates should be added on the lower surface of lower wings
as a base for bombs/tanks/rockets supports. I made the plates by adding
two separately grey painted rectangles of paper on the already aluminium
painted representation of the fabric layer. It's better to flatten the
nervures of the surface before gluing on the rectangles.
Position lights were painted at the upper wingtips.
 |
Landing gear
The landing gear legs need some improvement, as the addition of knees , pneumatic actuators and some other detail. The oval doors on the wheels are optional, they were often removed from operative planes. |
Painting
The most of I-153s were factory painted light grey (AEh-9) on metallic parts, and matt silver on fabric-covered surfaces. Many of them were found, both intact or wrecked, with this livery on captured airfields. Of course, this makes the planes too visible on the ground, so many types of non-standard camouflages were added on this base.
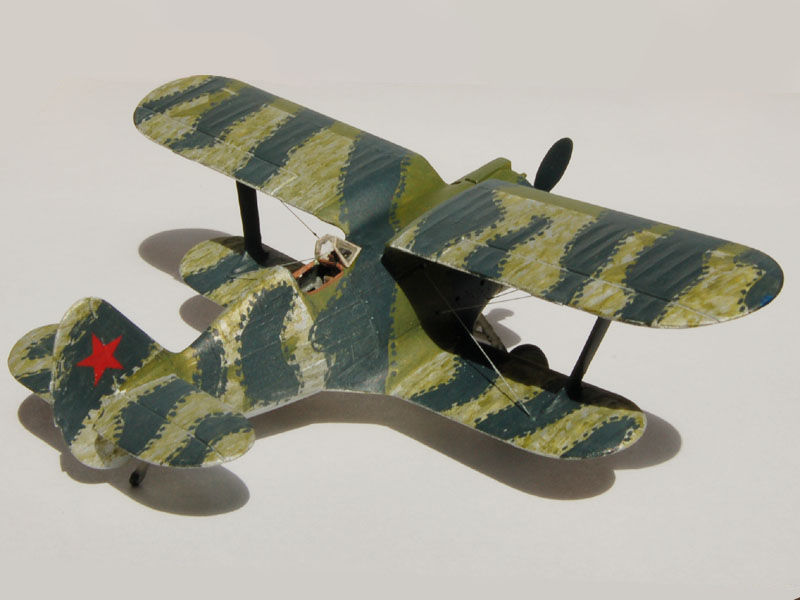
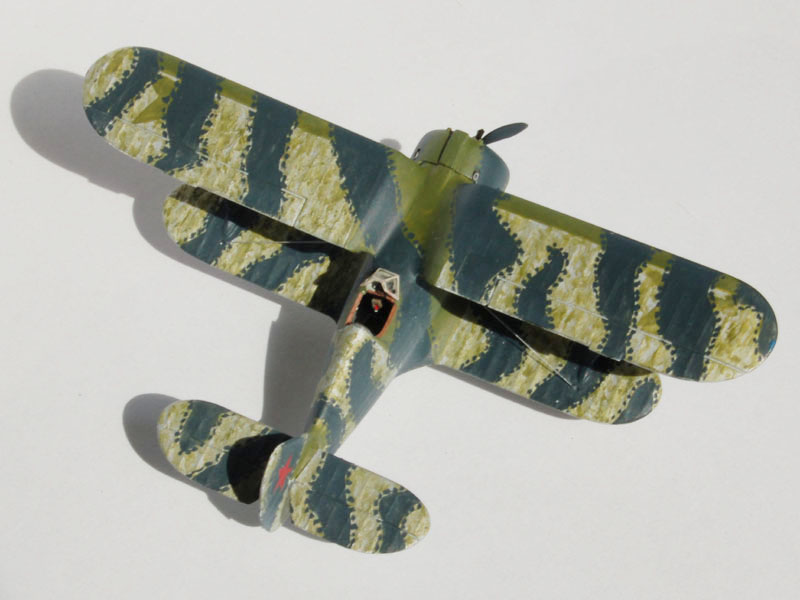
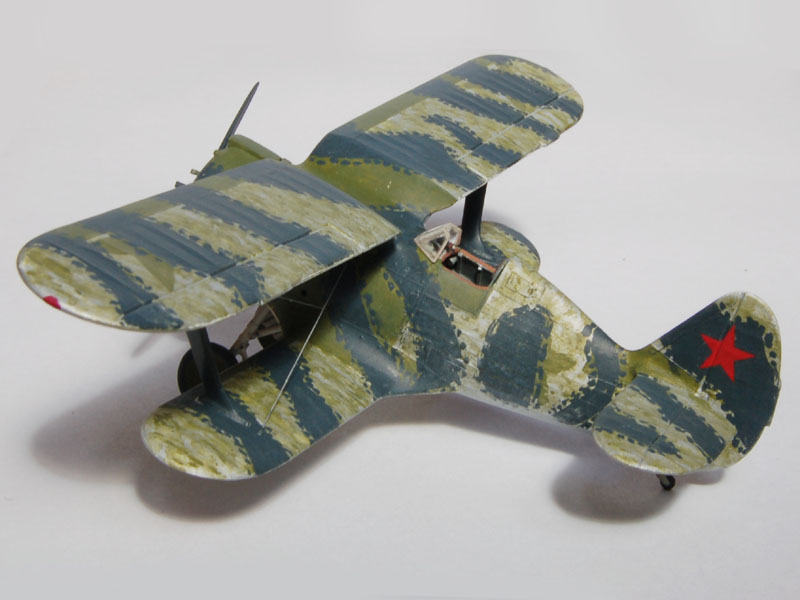
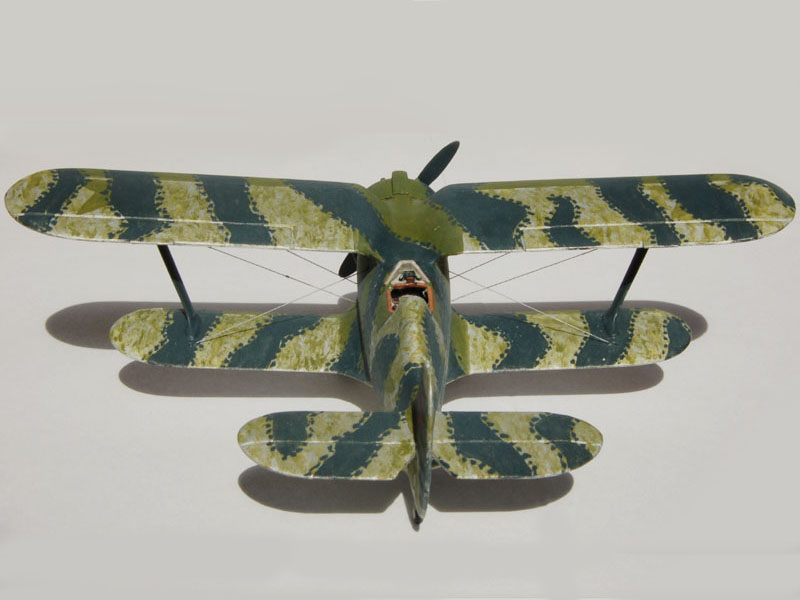
The plane of the photo, of 7th IAP, Leningrad area, 1941, show one of the most strange camouflages I've ever seen. It looks that a flat green layer was put on metallic parts of the nose, while the rear part of the plane was only marginally brushed by green that allows to see the underlying silver. Black stripes had their outlines broken by brush dots of various shapes: points, segments and irregular strokes. It's not clear if the silver background was visible on the fabric-covered uppersurfaces of wings.
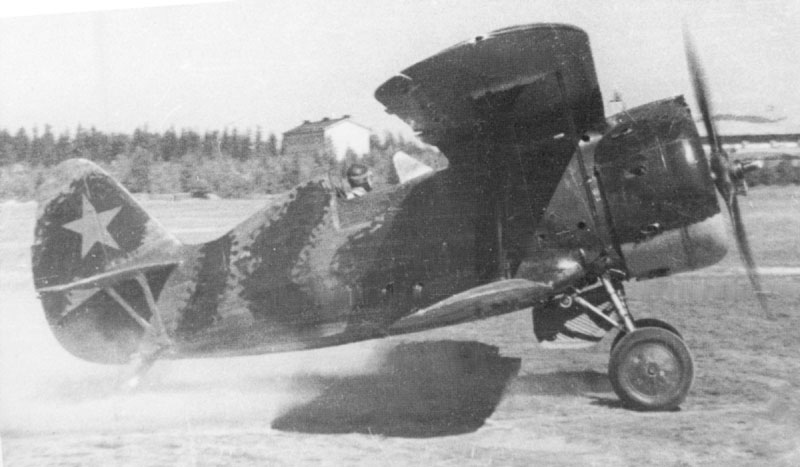
The stars are visible only on the tail and lower wing surfaces; it looks
that the stars on the fuselage (and, on my interpretation, on the upper
wing surfaces) were obliterated with green before painting the black bands.
Propeller and wheels were camouflaged too, while the windshield struts
look light grey or aluminium.
It's unclear why the silver surfaces of rear fuselage weren't fully
covered with green, Was this due to lack of time? Of paint? To an aesthetical
choice? To the reaction of the silver paint when hand brushed with fresh
green paint? This is unknown. However, I think that the camouflage was
made in two times. On a first time they brushed green, on silver and grey,
as on a lot of other I-153 seen on photos. In a second time, being unsatisfied
of the camo effect, they added the black bands all over and the solid green
layer of the nose.
We can only see that the painter demonstrated good fantasy, but poor
accuracy in this improvised hand-brush work.
Reproducing an unaccurate original work can be imbarassing: on one side, a perfect reproduction could give the idea of a badly-painted model. On the other hand, an idealized livery don't bear the comparison to photos. I decided for the first solution; I've even slightly emphasized the roughness of the painting work to mark that it's made by choice.
About decals: I've utilized some red stars advanced from the I-15 bis of ICM. The one on the tail is plain, and it's likely made when the original plane was repainted; the ones on wing undersurfaces were probably the original stars, likely with black circles inside, but, being not sure of this, I preferred to preserve the rare decals with circles of my spare decals magazine.
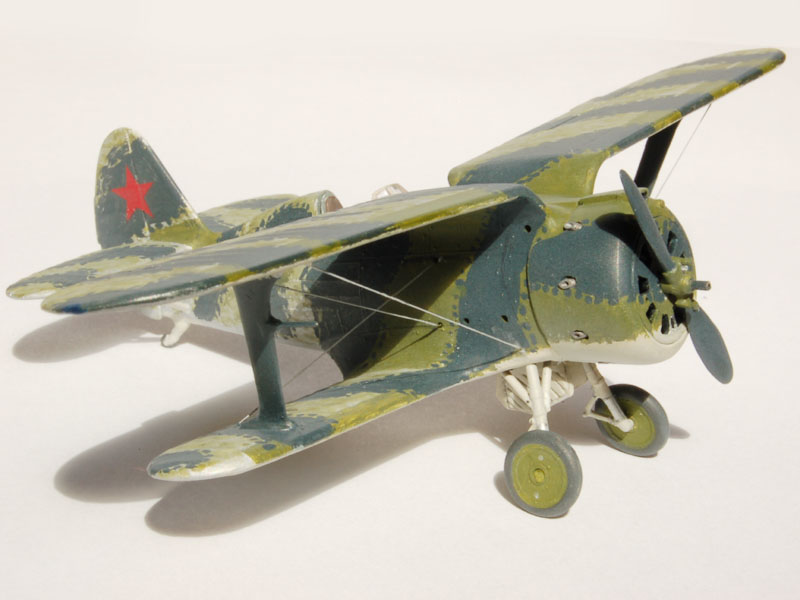
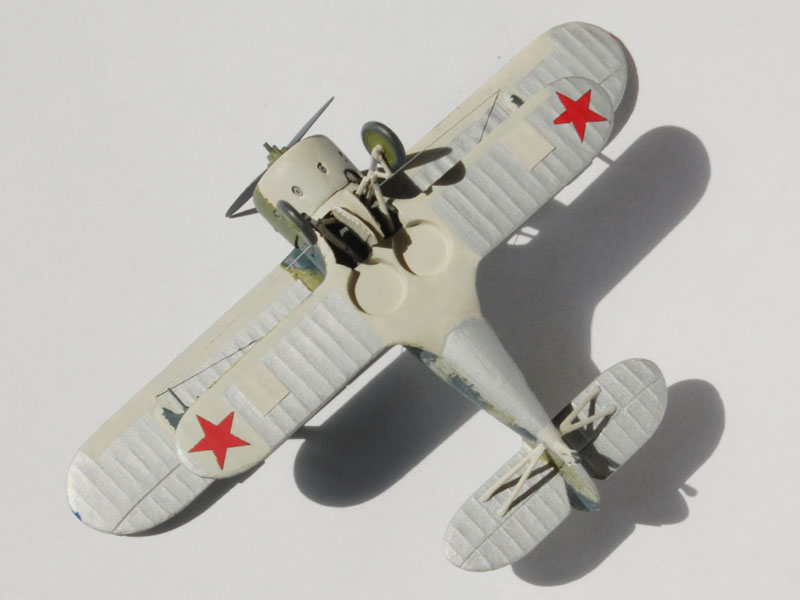
At the end, here are some photos of my model. It is not great as a quality,
but it has some points of interest all the same.
 |
 |
 |
 |
 |
 |
Main references for this model:
Polikarpow I-153 of M.Maslov, Militaria n.222;
Polikarpov fighters in action pt.1 by Hans-Heiri Stapfer
Polikarpov's biplane fighters of Yefim Gordon and Keith Dexter
Barbarossa Victims of Tomasz Kopanski
Soviet Air force Fighting Colors 1941-1945 of Erik Pilawskii
http://walkarounds.airforce.ru/avia/rus/polikarpov/i-153/index.htm
A good walkaround on the plane recovered at Bourget.
http://www.aircraftresourcecenter.com/
A good walkaround of a rebuilt plane.
http://vvs.hobbyvista.com/ModelArticles/i153/i153-kits.html
An article comparing the pieces of the kit to drawings.
http://www.airwar.ru/other/draw/i153.html
Some good drawings.
http://www.airwar.ru/other/draw/i153eksprint.html
Other drawings.
http://www.avia-n-aero.ru/photo.php
An huge collection of wartime photos, forthemost of German origin, where
one can find a lot of images of wrecked I-153s.